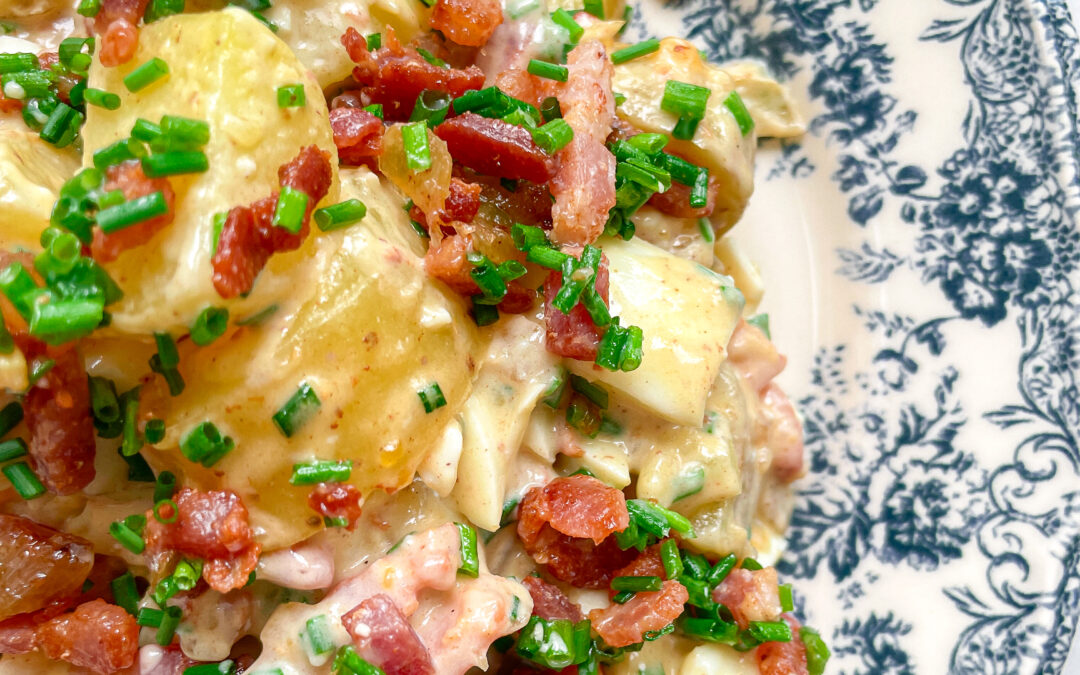
Potato Salad with Eggs Bacon Pickles & Caramalized Onions

Potato Salad with Eggs Bacon Pickles & Caramalized Onions

Potato Salad with Eggs Bacon Pickles & Caramalized Onions

Potato Salad with Eggs Bacon Pickles & Caramalized Onions

November 24, 2024 by Kimberly

Dive into a delicious story with our creamy potato salad! Imagine boiled eggs, smoky bacon, tangy pickles, and sweet caramelized onions coming together for a magical taste in every bite.

This website uses affiliate links which may earn commission for purchases made at no additional cost to you.

TOTAL TIME

1 hr + 20 min

SERVES

8 portions

DIET

omnivore

EVERY RECIPE DESERVES

A Little Love Letter

Step into a world of flavor with this Potato Salad featuring the perfect quartet of ingredients – eggs, bacon, pickles, and caramelized onions. This delightful twist on a classic dish promises a harmonious blend of creamy textures and mouthwatering tastes.

Present this Potato Salad on a festive platter, allowing the vibrant colors and aromas to captivate your guests. Garnish with fresh chives for a burst of color. Ideal as a side dish for barbecues or picnics, this salad also shines as a standalone star at family gatherings. Serve chilled and watch as each forkful becomes a symphony of flavors. 

To maintain the salad’s freshness, store any leftovers in an airtight container in the refrigerator for up to three days. Gently toss before serving to restore its creamy consistency. While this salad is best enjoyed fresh, you can prepare it a day ahead and refrigerate, adding the bacon just before serving to retain its crispiness.

Hi, I'm Kimberly!

Hi, I'm Kimberly.

A hopeless romantic when it comes to food. Every recipe I share is a love letter to food itself. I’m so glad you’re here. Make yourself at home and stay a while.

Love,
Kimberly

Kimberly the Zett Signature

If you want to get to know me better,
click here!


Potato Salad with Eggs Bacon Pickles & Caramalized Onions

LET’S MAKE A PIECE OF HAPPINESS

Print
clock clock iconcutlery cutlery iconflag flag iconfolder folder iconinstagram instagram iconpinterest pinterest iconfacebook facebook iconprint print iconsquares squares iconheart heart iconheart solid heart solid icon
Potato Salad with Eggs Bacon Pickles & Caramalized Onions

Potato Salad with Eggs Bacon Pickles & Caramalized Onions


5 Stars 4 Stars 3 Stars 2 Stars 1 Star

No reviews

  • Author: Kimberly
  • Total Time: 80 min
  • Yield: 8 portions

Description

RECOMMENDED EQUIPMENT
  • sharp knife
  • chopping board
  • peeler
  • large pot
  • small pot
  • large pan
  • large salad bowl
  • medium bowl

Ingredients

Units Scale
SALAD COMPONENTS
  • 1 kilogramm potatoes
  • 250 grams bacon
  • 200 grams onion
  • 1 tbsp butter
  • 150 grams pickles
  • 8 eggs
DRESSING
  • 200 grams mayonnaise
  • 4-6 tbsp white wine vinegar
  • 3 tbsp chives
  • 4 tsp Dijon mustard
  • salt & pepper to taste

Instructions

PREPARATIONS

  • Peel the potatoes and cut into medium-sized pieces.
  • Peel the onions and cut into small pieces.
  • Cut the pickles into small pieces.
  • Cut the chives into small rolls.

INSTRUCTIONS

  1. Cook the potatoes in a large pot filled with salted water until done.
  2. Meanwhile, fill a small pot with water and bring to the boil. As soon as the water boils, add the eggs and cook for 8 minutes until firm. Drain the potatoes and eggs and set both aside to cool. It’s best to let the eggs cool in an ice bath to prevent them from cooking further.
  3. Caramelize the onions in 1 tbsp butter and a bit of salt in a pan for about 30 minutes. Remove the onions from the pan and fry the bacon until crispy. There may be a residue – the best way to deglaze this is with a dash of white wine or stock to release the wonderful aromas from the bottom of the pan.
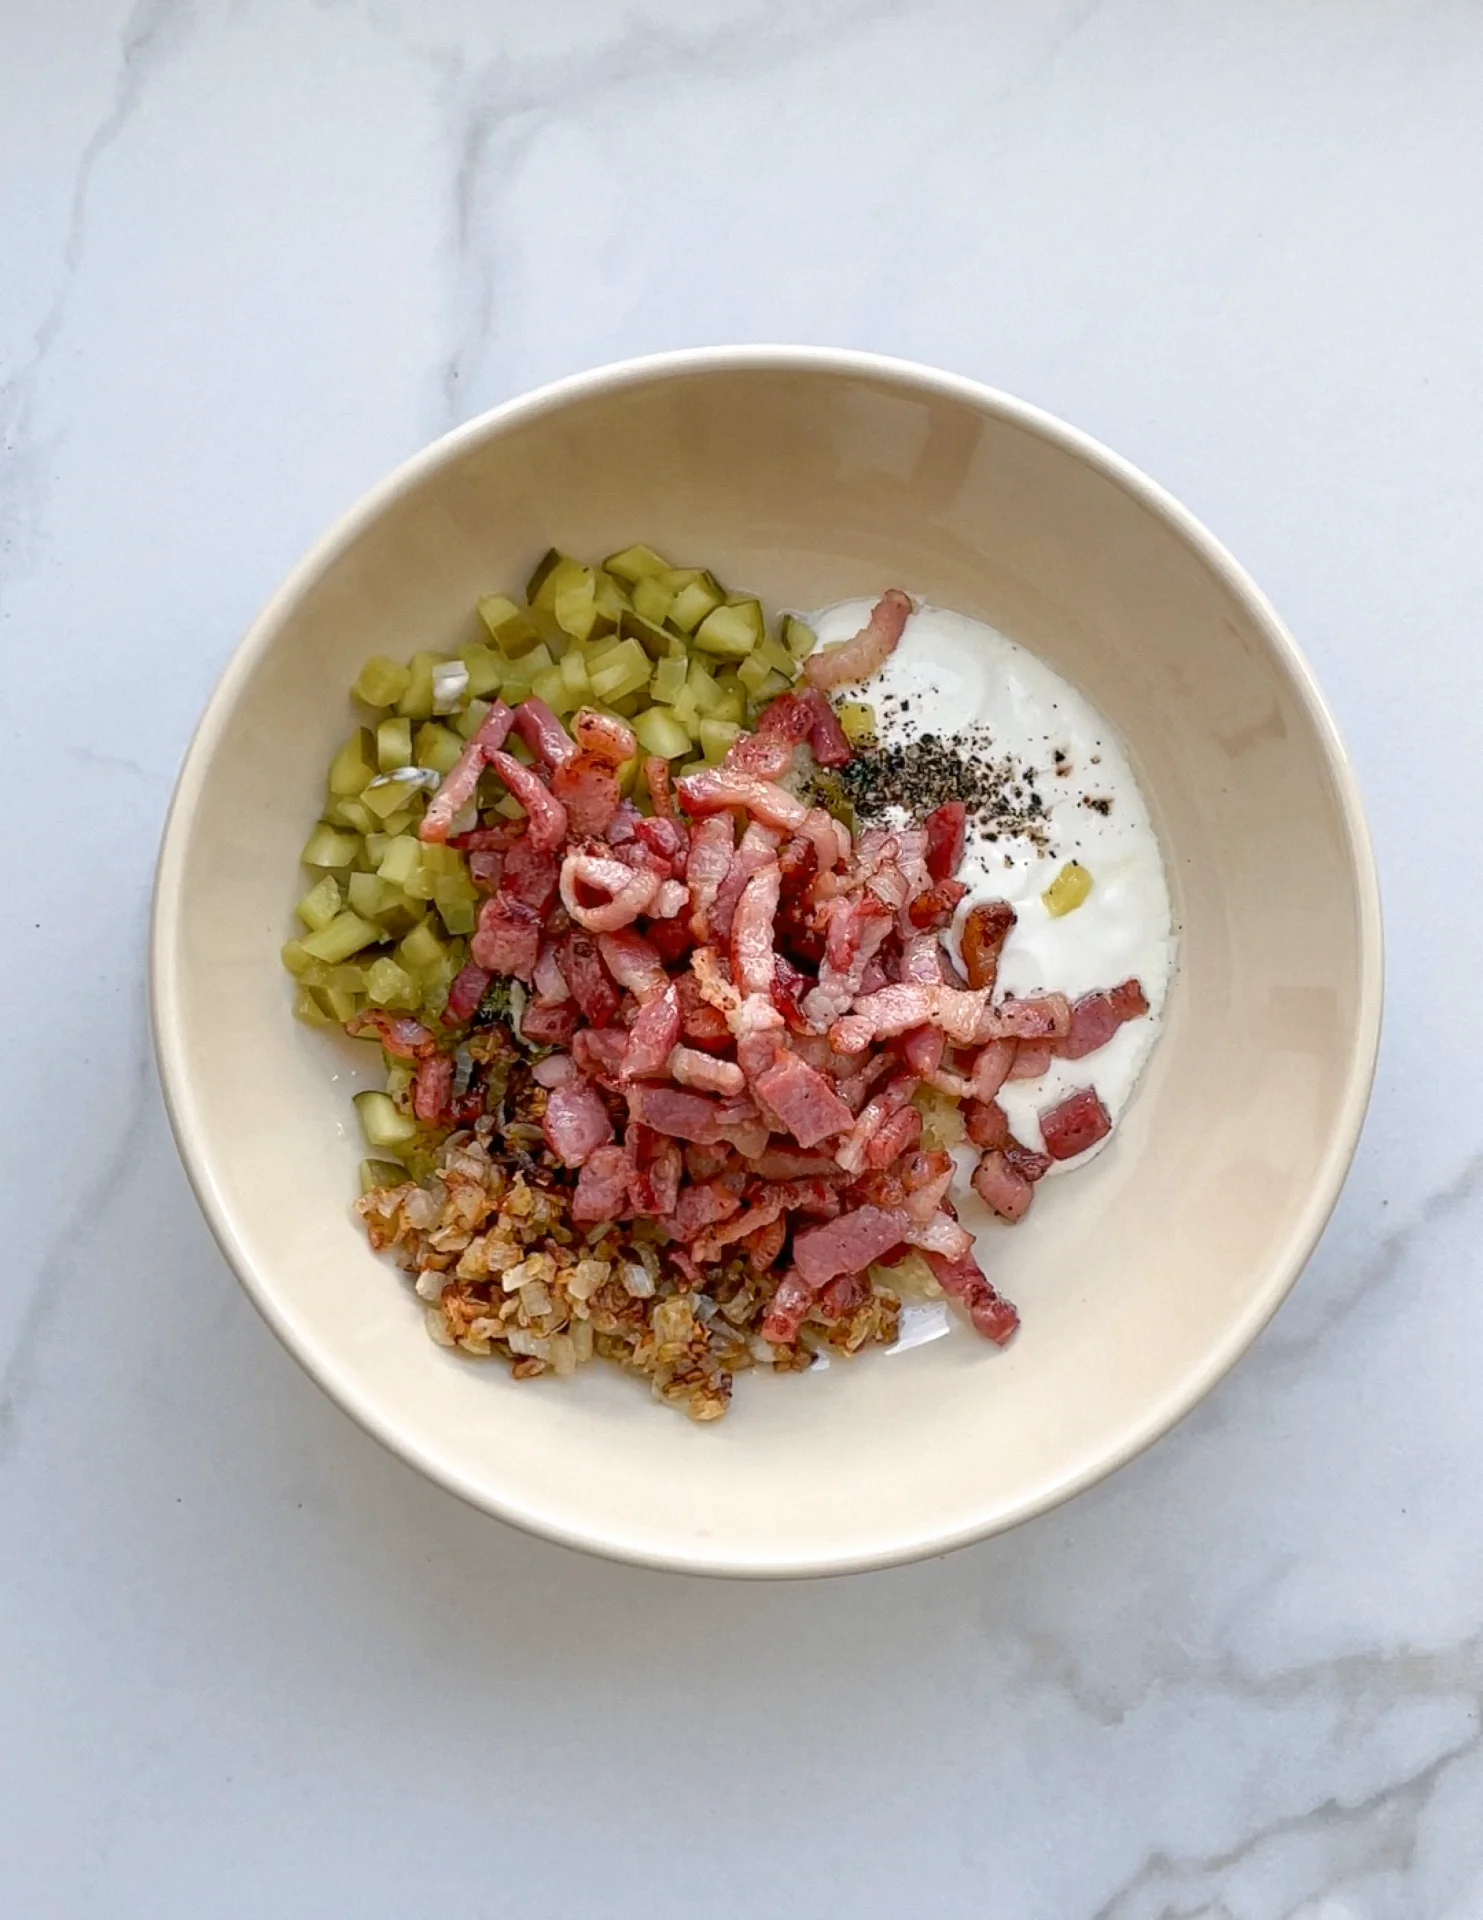
  4. Now peel the eggs and separate the yolks from the whites. Cut the egg whites into small pieces and set aside. Place the egg yolks in a medium-sized bowl. Add the fried bacon, caramelized onions, chives, pickles, dijon mustard, mayonnaise and white wine vinegar to the bowl. Stir everything together and season to taste with salt and pepper. Fold in the chopped egg white pieces. The mixture should taste very over-seasoned, as the potatoes will take away a lot of the flavor when they are mixed in later.
  5. When the potatoes are cooled cut them in coarse pieces, add them to the salad cream and mix everything well. Season to taste and serve.
  • Prep Time: 20 min
  • Passive Time: 40 min
  • Cook Time: 20 min

CRAVING MORE?

Follow along here & don’t forget to subscribe to my substack!

Easy Same Day Basic Focaccia

Easy Same Day Basic Focaccia

Quick & Easy - The Best Focaccia Recipe

Easy Same Day Basic Focaccia

October 26, 2024 by Kimberly

Golden-crisp on the outside, airy and soft inside, this fresh focaccia is the ultimate comfort! Perfect for dipping, snacking, or as a side – it’s irresistible, warm, and baked-to-perfection bliss.

This website uses affiliate links which may earn commission for purchases made at no additional cost to you.

TOTAL TIME

3 hrs + 30 min

SERVES

1 tray

DIET

vegetarian

EVERY RECIPE DESERVES

A Little Love Letter

Craving something warm, cozy, and seriously easy to bake? This focaccia is your answer! It’s got that perfect golden crust that you can’t resist breaking into and a soft, fluffy center that just melts in your mouth. Whether you’re new to baking or a seasoned bread lover, this focaccia has that fresh-baked, olive-oil-kissed goodness that makes it the ultimate comfort food. Plus, it’s ready in just 3.5 hours – no need to wait around for endless rises. Just mix, bake, and enjoy some bakery-style vibes at home!

This focaccia is so versatile – it pairs perfectly with just about anything! Tear off pieces to dip in olive oil and balsamic vinegar for a classic Italian feel, or serve it alongside a warm soup or pasta for a cozy meal. It also makes a great base for an open-faced sandwich or as an appetizer with some herby olive oil and fresh tomatoes. However you serve it, the fluffy texture and crispy edges will make it an instant favorite for everyone around the table. For an in-depth guide with secret tips & tricks, check out my ‚How-To Guide‘ for the Best Focaccia Recipe!

To keep that bakery-fresh vibe, store your focaccia in an airtight container or plastic wrap at room temperature for up to 2 days. You can also freeze it – wrap it tightly, and it’ll last up to 2 months. Just warm it in the oven to bring back the freshness.

Hi, I'm Kimberly!

Hi, I'm Kimberly.

A hopeless romantic when it comes to food. Every recipe I share is a love letter to food itself. I’m so glad you’re here. Make yourself at home and stay a while.

Love,
Kimberly

Kimberly the Zett Signature

If you want to get to know me better,
click here!


Easy Same Day Basic Focaccia

LET’S MAKE A PIECE OF HAPPINESS

Print
.tasty-recipe-responsive-iframe-container-4893503e { position: relative; overflow: hidden; padding-top: 56.3%; } .tasty-recipe-responsive-iframe-container-4893503e iframe { position: absolute; top: 0; left: 0; width: 100%; height: 100%; border: 0; } clock clock iconcutlery cutlery iconflag flag iconfolder folder iconinstagram instagram iconpinterest pinterest iconfacebook facebook iconprint print iconsquares squares iconheart heart iconheart solid heart solid icon
Quick & Easy - The Best Focaccia Recipe

Easy Same Day Basic Focaccia


  • Author: Kimberly
  • Total Time: 3 hrs + 30 min

Description

Recommended Equipment

  • large bowl
  • kitchen scale
  • thermometer (even a medicine one works)
  • measuring cup
  • wooden spoon
  • cling film, beeswax wrap, or a shower cap
  • baking dish or tray (mine is 20x26cm / 8×10 inch)
  • oven


Ingredients

Units Scale
  • 500 grams pizza flour (type 00 in Germany)
  • 400 grams luke-warm water
  • 1.5 tsp active dry-yeast
  • 1 tbsp olive oil
  • 1 tsp honey
  • 1.5 tsp salt
  • 50 milliliters olive oil for greasing and dipping

Instructions

  1. Combine the active-dry yeast with warm water (between 34-38°C / 93-100°F), olive oil, and a teaspoon of honey to get things started. Let it sit for about 10 minutes until it becomes bubbly and the oil floats on top with the activated yeast. Meanwhile, in a large bowl, mix your flour with the salt.
  2. Pour the activated yeast mixture into the flour. Using a wooden spoon, mix everything together until it forms a dough and no dry flour is left. It might look a bit shaggy at first, but that’s totally fine! Scrape down any dough stuck to the sides and cover the bowl with cling film, a beeswax towel, or a shower cap. Let it sit for 20 minutes to allow the flour to hydrate and the dough to start developing elasticity.
  3. After 20 minutes, uncover the dough and prepare a small bowl of warm water to dip your hands in for the stretch & fold process. This technique helps develop the gluten without kneading. To do it, gently pull one side of the dough up, stretch it, and fold it over the center. Rotate the bowl a quarter turn and repeat on all four sides. You’ll do this about three times, letting the dough rest in between. This method strengthens the dough and helps create that light, airy texture! Follow these steps:
    • First stretch & fold, then let the dough rest for 20 minutes covered
    • Second stretch & fold, then rest another 20 minutes covered
    • Third stretch & fold, then let it rest for 60 minutes covered
  4. After the final 60-minute rest, grab your oven dish and drizzle 2-3 tablespoons of olive oil to coat it generously. Carefully transfer the dough to the dish, lifting it gently with both hands. Place it back in the dish, folding any hanging dough underneath itself to give it structure and elasticity.
  5. Cover the dish and let the dough rest for another 60 minutes. During this time, the dough will rise and settle into the dish, preparing for its final transformation.
  6. Preheat the oven to 220°C / 430°F. After the dough’s last rest, uncover it and drizzle a little extra olive oil over the top. Use your fingers to gently press into the dough, forming dimples. This will encourage those signature bubbles to form during baking.
  7. Bake the focaccia for 20-25 minutes, or until it’s golden and crisp. Enjoy your freshly baked focaccia! Let the focaccia cool to room temperature. If you cut it while it’s still hot, it might tear apart. But honestly, it tastes sooo good when it’s warm. Just tear it up and dip it into your favorite dips!

  • Passive Time: 3 hrs + 20 min
  • Cook Time: 10 min

CRAVING MORE?

Follow along here & don’t forget to subscribe to my substack!

Cinnamon Rolls

Cinnamon Rolls

Cinnamon Rolls

Cinnamon Rolls

October 2, 2024 by Kimberly

When the days get shorter and autumn rolls in, there’s nothing better than a tray of freshly baked cinnamon rolls. Soft yeast dough, cinnamon, sugar, and a creamy glaze make this recipe my ultimate comfort classic, one that has become a yearly tradition in our home. Cozy, indulgent, and just perfect for marking the start of fall. These cinnamon rolls are fluffy, sweet, and impossible to resist, filling your kitchen with the scent of warm spices. A bake that turns any chilly day into a cozy moment of pure comfort.

This website uses affiliate links which may earn commission for purchases made at no additional cost to you.

TOTAL TIME

100 min

SERVES

12 rolls

DIET

vegetarian

EVERY RECIPE DESERVES

A Little Love Letter

There are recipes that feel less like baking and more like holding onto a little piece of childhood. For me, that’s cinnamon rolls. As you might know, I was born and raised in Germany. And when I was a kid, American products were nowhere to be found in German stores. Reese’s? Never heard of them. Five Guys? Not a clue. We had amazing German bakeries, of course, where they offered raisin swirls, streusel buns, all sorts of cakes, breads, but never those soft, fluffy, cream-covered rolls I had only seen in American movies.

Even back then, I was already a little food enthusiast, but I couldn’t imagine what cinnamon rolls might taste like. Sweet and soft, for sure, but beyond that? So at some point, since they simply didn’t exist in Germany, I created my very own cinnamon roll recipe, exactly the way my childhood self would have dreamed them. Pillowy, fluffy, full of cinnamon and sugar, with a creamy glaze that melts into the warm rolls.

And maybe that’s why I love them so much to this day, because they carry that little spark of wonder with them. The rolls are delicious, of course, but they’re also a reminder that food can hold stories, dreams, and even a sense of belonging. It’s a recipe that turned from imagination into reality.

Today, they’ve become a tradition. Every autumn, I pull out this recipe again. The kitchen filling with the scent of cinnamon, everyone at home knowing that cinnamon roll season has officially begun. I love to enjoy them with a big latte or a German Eggnog, lit a cozy candle, and suddenly the world feels just a little more whole again.

Hi, I'm Kimberly!

Hi, I'm Kimberly.

A hopeless romantic when it comes to food. Every recipe I share is a love letter to food itself. I’m so glad you’re here. Make yourself at home and stay a while.

Love,
Kimberly

Kimberly the Zett Signature

If you want to get to know me better,
click here!


Cinnamon Rolls
Cinnamon Rolls
Cinnamon Rolls
Cinnamon Rolls

LET’S MAKE A PIECE OF HAPPINESS

Print
.tasty-recipe-responsive-iframe-container-fcffccfc { position: relative; overflow: hidden; padding-top: 56.3%; } .tasty-recipe-responsive-iframe-container-fcffccfc iframe { position: absolute; top: 0; left: 0; width: 100%; height: 100%; border: 0; } clock clock iconcutlery cutlery iconflag flag iconfolder folder iconinstagram instagram iconpinterest pinterest iconfacebook facebook iconprint print iconsquares squares iconheart heart iconheart solid heart solid icon
Cinnamon Rolls

Cinnamon Rolls


5 from 1 review

  • Author: Kimberly
  • Total Time: 100 min
  • Yield: 12 rolls

Description

When the days get shorter and autumn rolls in, there’s nothing better than a tray of freshly baked cinnamon rolls. Soft yeast dough, cinnamon, sugar, and a creamy glaze make this recipe my ultimate comfort classic, one that has become a yearly tradition in our home. Cozy, indulgent, and just perfect for marking the start of fall. These cinnamon rolls are fluffy, sweet, and impossible to resist, filling your kitchen with the scent of warm spices. A bake that turns any chilly day into a cozy moment of pure comfort.

GOOD TO HAVE ON HAND

  • small bowl
  • small whisk
  • large bowl
  • plastic wrap
  • two medium bowls
  • rolling pin
  • sharp knife
  • baking dish
  • oven

Ingredients

Units Scale
DOUGH
  • 500 grams bread flour (in Germany that's Type 550)
  • 170 grams yogurt
  • 1/2 tsp salt
  • 1 egg
  • 130 milliliters full-fat milk
  • 1 tbsp white sugar
  • 21 grams fresh yeast
FILLING
  • 115 grams butter, room temperature
  • 150 grams brown sugar
  • 2 tbsp cinnamon
  • 1/4 tsp salt
  • 100 milliliters heavy cream
  • 50 milliliters cinnamon oil (optional)
FROSTING
  • 120 grams cream cheese
  • 120 grams powdered sugar
  • 50 grams butter, room temperature
  • 1 tsp vanilla extract
  • 1 tsp lemon juice

Instructions

  1. First, we activate the fresh yeast. Heat 130ml full-fat milk to a temperature between 32°C and 38°C (90°F to 100°F). Add 1 tbsp white sugar and stir well. Crumble in 21g fresh yeast and whisk until fully dissolved. Let the mixture sit for 5 minutes. You should see small bubbles forming on the surface by then.
  2. Meanwhile, in a large bowl, add 500g bread flour (Type 550 in Germany), 1/2 tsp salt, 170g yogurt, and 1 egg. Pour in the yeast mixture and stir everything together with a wooden spoon. Transfer the dough to a clean work surface and knead by hand for about 10–15 minutes. The goal is to get a smooth and elastic dough. Using an electric mixer will cut the time in half. The dough is ready when you can stretch a piece thin enough to let light through without tearing. Place the dough back in the bowl and cover it with plastic wrap to keep it from drying out. Let it rise in a warm, draft-free spot for about an hour until it doubles in size.
  3. In the meantime, prepare the filling. Mix together 115g room-temperature butter, 150g brown sugar, 2 tbsp cinnamon, and 1/4 tsp salt into a creamy mixture. Set it aside at room temperature.
  4. Next, prepare the frosting. Mix together 120g cream cheese, 120g powdered sugar, 50g room-temperature butter, 1 tsp vanilla extract, and 1 tsp lemon juice until smooth and creamy. Store in the fridge until ready to use.
  5. After the dough has risen for an hour, it should have doubled in size and is ready to work with. Prepare a large baking dish. Transfer the dough to a lightly floured, clean surface and roll it out to a 50×30 cm (about 20×12 inch) rectangle. Spread the butter-sugar-cinnamon mixture evenly over the dough. Then, cut the dough lengthwise into 12 equal strips. Roll each strip into a spiral and place them in the baking dish, forming 3 rows of 4 rolls. Let the rolls rise again for another 30 minutes.
  6. About 10 minutes before the rising time is up, preheat the oven to 190°C (375°F). Once the rolls have risen, pour 100ml heavy cream and, if you like, 50ml cinnamon oil in between the rolls. Bake for 20–25 minutes until the tops are golden brown. Be careful not to overbake them, as they may become dry.
  7. Remove the rolls from the oven and let them cool for about 10 minutes. Take the frosting out of the fridge and spread it evenly over the warm rolls. Enjoy!
  • Prep Time: 15 min
  • Passive Time: 60 min
  • Cook Time: 25 min

CRAVING MORE?

Follow along here & don’t forget to subscribe to my substack!

English Muffins

English Muffins

English Muffins

English Muffins

September 16, 2024 by Kimberly

Soft, fluffy, and perfectly golden – these warm homemade breakfast bites are pure comfort. Ideal for lazy mornings or a cozy brunch, they’ll instantly make you feel like a pro in the kitchen.

This website uses affiliate links which may earn commission for purchases made at no additional cost to you.

TOTAL TIME

1 hr + 50 min

SERVES

12 muffins

DIET

vegetarian

EVERY RECIPE DESERVES

A Little Love Letter

There’s nothing like the feeling of biting into a soft, warm, homemade breakfast muffin, fresh from the pan. They’re golden, fluffy, and absolutely perfect for cozy mornings or a weekend brunch. Whether you’re topping them with butter, jam, or using them as the base for a breakfast sandwich, these little bites of comfort will brighten up any meal. Plus, making them from scratch is way easier than you might think – and the result? Total kitchen hero vibes.

You can slice them open and spread them with butter or a dollop of your favorite jam. Or, level up your brunch game by turning them into breakfast sandwiches. Load them up with eggs, cheese, bacon, or avocado. Whether it’s a simple snack or a fully loaded breakfast, these muffins are ready for anything!

To keep them fresh, store your muffins in an airtight container at room temperature for up to three days. If you want to keep them longer, just pop them in the freezer!

Hi, I'm Kimberly!

Hi, I'm Kimberly.

A hopeless romantic when it comes to food. Every recipe I share is a love letter to food itself. I’m so glad you’re here. Make yourself at home and stay a while.

Love,
Kimberly

Kimberly the Zett Signature

If you want to get to know me better,
click here!


English Muffins
English Muffins
English Muffins
English Muffins

LET’S MAKE A PIECE OF HAPPINESS

Print
.tasty-recipe-responsive-iframe-container-0bf2e47e { position: relative; overflow: hidden; padding-top: 56.3%; } .tasty-recipe-responsive-iframe-container-0bf2e47e iframe { position: absolute; top: 0; left: 0; width: 100%; height: 100%; border: 0; } clock clock iconcutlery cutlery iconflag flag iconfolder folder iconinstagram instagram iconpinterest pinterest iconfacebook facebook iconprint print iconsquares squares iconheart heart iconheart solid heart solid icon
English Muffins

English Muffins


  • Author: Kimberly
  • Total Time: 1 hr + 50 min
  • Yield: 12

Description

Recommended Equipment

  • large bowl
  • spatula
  • plastic wrap
  • round cookie cutter
  • parchment paper
  • large pan

Ingredients

Units Scale
  • 7 grams drive-active yeast
  • 25 grams white sugar
  • 200 milliliters full-fat cow milk
  • 100 milliliters water
  • 1 egg
  • 40 grams butter
  • 1.5 tsp salt
  • 550 grams bread flour (in Germany Type 550)
  • semolina

Instructions

  1. Stir together the yeast, warm milk, warm water, and sugar in a large bowl and let it sit for 10 minutes. The milk and water should be between 32°-36°C / 90°-97°F.
  2. Add the egg to the melted butter, mix well, and pour it into the bowl with the yeast mixture. Then add the flour and salt, and mix everything with a spatula until the dough is smooth and sticky. Keep kneading by hand until the dough no longer sticks to your fingers. This should take about 10 minutes. Put the dough back in the bowl and cover it with plastic wrap. Let it rest for about 45 minutes.
  3. Sprinkle some semolina on your work surface, place the dough on it, and flatten it to about 2-3 cm thick. Sprinkle a bit of semolina on top of the dough as well. Use a round cutter to cut out circles, place them on parchment paper, and cover them with a damp cloth to rest for 15 minutes.
  4. Heat a pan and once it’s warm (you should feel the heat when your hand is close to it), place the dough circles in the pan. Cook them on low heat for 5-7 minutes on each side until they are crispy and golden brown on the outside, and soft and fluffy on the inside. Keep the finished English muffins warm in a bread basket with a towel, and enjoy! 🙂
  • Passive Time: 70 min
  • Cook Time: 40 min

CRAVING MORE?

Follow along here & don’t forget to subscribe to my substack!

Crispy Chicken with Peanut Coconut Sauce & Edamame Slaw

Crispy Chicken with Peanut Coconut Sauce & Edamame Slaw

Crispy Chicken with Peanut Coconut Sauce & Edamame Slaw

Crispy Chicken with Peanut Coconut Sauce & Edamame Slaw

September 12, 2024 by Kimberly

Crunchy, juicy chicken strips paired with a creamy, nutty peanut coconut sauce and a fresh, zesty edamame slaw. It’s comfort food with a twist – bold, fresh, and absolutely irresistible!

This website uses affiliate links which may earn commission for purchases made at no additional cost to you.

TOTAL TIME

30 min

SERVES

3 bowls

DIET

omnivore

EVERY RECIPE DESERVES

A Little Love Letter

This dish is the perfect mix of comfort and fresh, bold flavors. Juicy chicken strips with a golden, crispy coating are served alongside a creamy, dreamy peanut coconut sauce that has just the right balance of nuttiness and sweetness. Paired with a zesty edamame slaw, this combo is perfect for when you want something that feels indulgent but light and fresh at the same time. It’s all about that crunch, that sauce, and that fresh bite!

These crispy chicken strips are best served hot and fresh out of the pan with the sauce on the side or drizzled on top – your call! The peanut coconut sauce adds that creamy richness, and the fresh edamame slaw balances everything with its light crunch. Perfect for a casual weeknight dinner, a weekend lunch, or even a fun appetizer for a gathering. Pair it with some steamed rice or fresh greens for an extra touch.

Store any leftover chicken and slaw separately in airtight containers in the fridge for up to 2 days. To keep the chicken crispy, reheat it in the oven instead of the microwave. The peanut coconut sauce can be kept for 3 days in the fridge.

Hi, I'm Kimberly!

Hi, I'm Kimberly.

A hopeless romantic when it comes to food. Every recipe I share is a love letter to food itself. I’m so glad you’re here. Make yourself at home and stay a while.

Love,
Kimberly

Kimberly the Zett Signature

If you want to get to know me better,
click here!


Crispy Chicken with Peanut Coconut Sauce & Edamame Slaw

LET’S MAKE A PIECE OF HAPPINESS

Print
clock clock iconcutlery cutlery iconflag flag iconfolder folder iconinstagram instagram iconpinterest pinterest iconfacebook facebook iconprint print iconsquares squares iconheart heart iconheart solid heart solid icon
Crispy Chicken with Peanut Coconut Sauce & Edamame Slaw

Crispy Chicken with Peanut Coconut Sauce & Edamame Slaw


  • Author: Kimberly
  • Total Time: 30 min
  • Yield: 3

Description

Recommended Equipment

  • sharp knife
  • cutting board
  • salad bowl
  • two small bowls
  • sieve
  • small pot with lid
  • three shallow bowls for breading
  • large pan

Ingredients

Units Scale
CRISPY CHICKEN
  • 400 grams chicken breast
  • 2 tbsp all-purpose flour
  • 1 egg
  • 4 tbsp panko
  • 4 tbsp bread crumbs
  • clarified butter for frying
PEANUT COCONUT SAUCE
  • 3 tbsp peanut butter
  • 1 tbsp soy sauce
  • 1/2 tbsp rice vinegar
  • 1 tsp sesame oil
  • 1 tbsp honey
  • juice of 1/2 a lemon
  • 1 garlic clove
  • 1 piece of ginger as the same size as the garlic clove
  • 1 tsp fish sauce
  • 1 tbsp sweet & sour sauce
  • 100 milliliters coconut milk
  • 1/2 tsp chili flakes
SLAW
  • 150 grams red cabbage
  • 150 grams white cabbage
  • 100 grams edamame
  • 1 spring onion
  • 2 tbsp cilantro
SLAW DRESSING
  • 1/2 tbsp sesame seeds
  • 1/2 tbsp rice vinegar
  • 1 tbsp honey
  • 2 tbsp soy sauce
  • 1/4 tsp ginger powder
  • 1/4 tsp garlic powder
  • juice of 1/2 a lemon

Instructions

  1. First, we’ll prepare the slaw. Slice the red and white cabbage into thin strips, wash them thoroughly, dry them, and put them in a salad bowl. Place the frozen edamame in a heatproof bowl and pour boiling water over them. Let them sit for 5 minutes. In the meantime, slice the spring onions into thin rings and pick the cilantro leaves off the stems, chopping them finely. Add both to the cabbage. Drain the edamame and add them to the slaw as well. Mix everything well and set it aside.
  2. Next, grab a small bowl to prepare the dressing for the salad. Mix rice vinegar, honey, soy sauce, lime juice, sesame seeds, garlic powder, and ginger powder. Don’t pour the dressing over the slaw just yet—set it aside for now.
  3. Now, let’s make the peanut coconut sauce. Peel and grate the garlic and ginger, then sauté them in some sesame oil in a small pot. Add the following ingredients: soy sauce, rice vinegar, honey, sweet & sour sauce, lime juice, fish sauce, chili, and coconut milk. Stir everything well. If the sauce is too thick, just thin it out with a little water. Keep it warm on very low heat with the lid on.
  4. Set up a breading station with flour, egg, and a mix of panko and breadcrumbs. Coat the chicken in flour, shake off the excess, then dip it in the egg, making sure it’s well-covered. Finally, press it into the panko and breadcrumb mixture, ensuring the breading sticks well on all sides. Fry the chicken in a large pan with a bit of clarified butter over medium heat until crispy and cooked through. Slice the chicken into strips.
  5. Pour the dressing over the slaw and mix everything well. Distribute the salad onto deep plates, then drizzle the peanut coconut sauce over it. Finally, place the crispy chicken strips on top of the sauce. Optionally, garnish with sesame seeds and spring onions.
  • Cook Time: 30 min

CRAVING MORE?

Follow along here & don’t forget to subscribe to my substack!

Chinese Holy Trinity Oil – Scallion Ginger & Garlic

Chinese Holy Trinity Oil – Scallion Ginger & Garlic

Chinese Holy Trinity Oil - Scallion Ginger & Garlic

Chinese Holy Trinity Oil (Scallion, Ginger & Garlic)

August 27, 2024 by Kimberly

Elevate your dishes with a burst of bold flavors from this aromatic oil, infused with the warm, comforting essence of scallion, ginger, and garlic – perfect for any dish craving a flavor boost.

This website uses affiliate links which may earn commission for purchases made at no additional cost to you.

TOTAL TIME

75 min

SERVES

1 cup / 250 ml

DIET

vegan

EVERY RECIPE DESERVES

A Little Love Letter

Ready to level up your cooking game? This aromatic infused oil brings together the bold and comforting flavors of scallion, ginger, and garlic in one versatile powerhouse. It’s like having a secret weapon in your kitchen, instantly adding a rich, savory depth to any dish. Whether you’re stirring it into a stir-fry, drizzling it over noodles, or using it as a base for soups, this oil is your go-to for making every meal a little more special.

This versatile kitchen oil shines brightest when used as a finishing touch on your favorite dishes. Drizzle it over freshly steamed rice, toss it with stir-fried veggies, or mix it into your dipping sauces for an extra punch of flavor. It’s also fantastic as a marinade base or brushed onto grilled meats for a savory, aromatic crust. The possibilities are endless—this oil is perfect for any dish that could use a little warmth and depth. Try it with this Chicken Katsudon and massage 1-2 tbsp into the napa cabbage. It’s heavenly.

To keep this flavorful cooking oil at its best, store it in a clean, airtight container in a cool, dark place. It’ll stay fresh and aromatic for up to 1-2 weeks, so you can reach for it whenever your dishes need a quick and easy flavor boost.

Hi, I'm Kimberly!

Hi, I'm Kimberly.

A hopeless romantic when it comes to food. Every recipe I share is a love letter to food itself. I’m so glad you’re here. Make yourself at home and stay a while.

Love,
Kimberly

Kimberly the Zett Signature

If you want to get to know me better,
click here!


Chinese Holy Trinity Oil (Scallion, Ginger & Garlic)

LET’S MAKE A PIECE OF HAPPINESS

Print
.tasty-recipe-responsive-iframe-container-c7208b1f { position: relative; overflow: hidden; padding-top: 56.3%; } .tasty-recipe-responsive-iframe-container-c7208b1f iframe { position: absolute; top: 0; left: 0; width: 100%; height: 100%; border: 0; } clock clock iconcutlery cutlery iconflag flag iconfolder folder iconinstagram instagram iconpinterest pinterest iconfacebook facebook iconprint print iconsquares squares iconheart heart iconheart solid heart solid icon
Chinese Holy Trinity Oil (Scallion, Ginger & Garlic)

Chinese Holy Trinity Oil – Scallion Ginger & Garlic


  • Author: Kimberly
  • Total Time: 75 min
  • Yield: 250 ml / 1 cup

Description

RECOMMENDED EQUIPMENT

  • blender
  • medium-sized saucepan
  • whisk
  • a bowl which the medium saucepan fits into
  • 2 medium-sized bowls
  • 2 fine sieves
  • sealable container (oil bottle)
  • ice cubes
  • coffee filter

Ingredients

Units Scale
  • 5 garlic cloves
  • 20 grams ginger
  • 1 scallion
  • 250 milliliters rapeseed oil

Instructions

  1. Cut the ginger and scallion into coarse pieces and peel the garlic clove. Put all pieces into the blender. Pour in the oil. Blend on the highest setting until there are only tiny pieces left.
  2. Pour the mixture from the blender into a medium-sized pot and heat it over medium heat to a temperature of about 103°C (217°F), and maintain this temperature for the next 40 minutes. Stir occasionally, making sure the temperature remains steady and nothing gets burned.
  3. Prepare a bowl large enough to fit a medium-sized pot, and fill it with cold water and a handful of ice cubes. Also, hang a fine sieve strainer over one medium-sized bowl and another fine sieve strainer, with a coffee filter inside it, over another medium-sized bowl.
  4. Now, place the pot in the ice water and stir to cool the oil quickly. Once the oil is almost cold, remove the pot from the water and pour the oil into the prepared fine sieve to catch the coarse particles.
  5. Then, pour the oil into the second sieve, which is equipped with a coffee filter, to catch the remaining finer particles.
  6. Allow the oil to drip through for about 30 minutes or maybe less depending on how many remaining particles are in the coffee filter. Once all the oil has passed through the coffee filter, transfer the collected amount of oil into a sealable container or directly into an oil bottle. Store in the refrigerator for up to one week.
  • Prep Time: 5 min
  • Passive Time: 30 min
  • Cook Time: 40 min

CRAVING MORE?

Follow along here & don’t forget to subscribe to my substack!