Pasta al Pomodoro

Pasta al Pomodoro

Pasta al Pomodoro

Pasta al Pomodoro

November 5, 2024 by Kimberly

Imagine al dente pasta coated in a fresh, rich garlic basil tomato sauce – each bite bursting with Mediterranean sunshine, cozy comfort, and pure bliss. This dish tastes like home, every single time.

20 MINUTES

EASY

VEGAN

ITALIAN

589 PER PORTION

COMFORT FOOD

WEEKNIGHT

DINNER

ALL YEAR

INTRODUCTION

ABOUT THE RECIPE

Get ready to taste sunshine on a plate! This recipe brings you straight to an Italian summer with every bite – simple, cozy, and irresistibly delicious. This dish is all about fresh tomatoes simmered into a rich, velvety sauce that clings to each pasta strand, making it the ultimate comfort food. Perfect for weeknight dinners or when you crave a warm, feel-good meal, it’s easy to make but feels like pure indulgence.

How to serve
To make it unforgettable, serve this pasta with fresh basil and a dusting of Parmesan. A side of crusty garlic bread or a light salad with arugula and lemon vinaigrette balances the richness, adding that final touch. For a real treat, drizzle a bit of high-quality olive oil over the top just before serving. It’s simple but adds incredible depth and brings the dish to life, making it feel like a restaurant meal in the comfort of your home.

How to store
Store any leftovers in an airtight container in the fridge for up to 3 days. Reheat gently on the stovetop, adding a splash of water or olive oil to keep the sauce creamy. This way, you can enjoy it as good as fresh!

Hi, I'm Kimberly!

Hi, I'm Kimberly.

A passionate food lover who believes in the magic of homemade deliciousness that spreads love and warmth. Join me on this culinary adventure as I prepare wonderful dishes and let’s spread some happiness together!

Kimberly the Zett Signature

If you want to get to know me better, click here!


Pasta al Pomodoro
Pasta al Pomodoro
Pasta al Pomodoro
Pasta al Pomodoro
Pasta al Pomodoro
„Let’s make a piece of happiness“
Print
clock clock iconcutlery cutlery iconflag flag iconfolder folder iconinstagram instagram iconpinterest pinterest iconfacebook facebook iconprint print iconsquares squares iconheart heart iconheart solid heart solid icon
Pasta al Pomodoro

Pasta al Pomodoro


5 Stars 4 Stars 3 Stars 2 Stars 1 Star

No reviews

  • Author: Kimberly
  • Total Time: 20 min
  • Yield: 4 1x

Description

Recommended Equipment

  • large frying pan
  • sharp knife
  • cutting board
  • large pot

Ingredients

Units Scale
  • 4 tbsp olive oil
  • 4 garlic cloves
  • 1 fresh chili
  • 500 grams strained tomatoes
  • 10 grams fresh basil
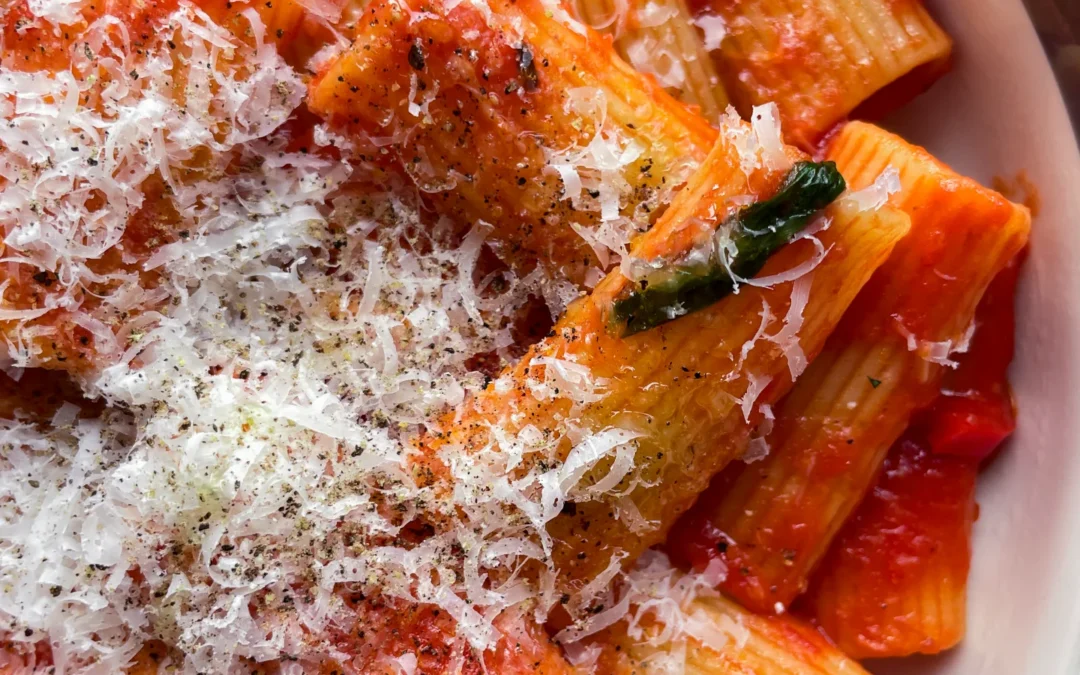
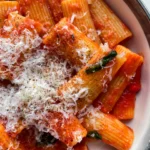
  • 500 grams pasta of your choice (I used Rigatoni)
  • Parmesan
  • Salt & pepper to taste

Instructions

  1. Warm up 4 tbsp of olive oil over medium heat in a large frying pan. Meanwhile, peel the garlic cloves but leave them whole. Once the oil is warm, add the garlic cloves and let them roast until golden brown. It helps to tilt the pan so the oil pools in one spot, letting the garlic cloves fully submerge.
  2. When the garlic is golden brown, remove it from the pan and set it aside on a cutting board to cool slightly. Meanwhile, get a large pot of water ready for cooking your pasta, place it on the stove, and bring it to a rolling boil.
  3. Now mash the garlic into a paste with a bit of salt using the flat side of your knife on the cutting board – the salt helps break it down. Add this garlic paste back into the olive oil in the pan. Finely chop a fresh chili and add it to the pan as well. Warm everything over medium heat. Meanwhile, wash, dry, and thinly slice the basil leaves. Add the strained tomatoes and basil to the pan, stirring everything well, and let it simmer on low heat.
  4. Add the pasta and a bit of salt to the boiling water, cooking it until al dente. Season the tomato sauce with salt and pepper to taste.
  5. Transfer the pasta to the tomato sauce, add a bit of the pasta water, and stir until the noodles are fully coated in the sauce. Serve the pasta on deep plates, topped with freshly grated Parmesan and a sprinkle of pepper.
  • Cook Time: 20 min

Pumpkin Tarte Flambée with Bacon Walnuts Gorgonzola & Lamb’s Lettuce

Pumpkin Tarte Flambée with Bacon Walnuts Gorgonzola & Lamb’s Lettuce

Pumpkin Tarte Flambée with Bacon Walnuts Gorgonzola & Lamb's Lettuce

Pumpkin Tarte Flambée with Bacon Walnuts Gorgonzola & Lamb’s Lettuce

October 12, 2024 by Kimberly

This cozy fall gem combines crispy bacon, rich Gorgonzola, crunchy walnuts, and and sweet pumpkin. The flavors are warm and savory, perfect for curling up on a chilly evening.

45 MINUTES

EASY

OMNIVORE

INT.

678 PER PORTION

CRISPY
UMAMI

EVERYDAY

DINNER

AUTUMN

INTRODUCTION

ABOUT THE RECIPE

Nothing says cozy fall like this delicious pumpkin tarte flambée. It’s packed with crispy bacon, creamy Gorgonzola, sweet pumpkin and the crunch of walnuts. This simple yet sophisticated dish brings the perfect blend of salty, sweet, and nutty flavors that will make you feel like you’re indulging in something extra special. Perfect for a weekend night or when you want something quick and comforting without too much effort. Pair it with a fresh salad, and you’ve got the ultimate cozy meal!

How to serve
Serve this flatbread hot and fresh, right from the oven! Slice it up into easy-to-grab pieces and drizzle with a bit of pumpkin oil for that extra touch of warmth. It’s ideal as a cozy dinner with a side of lamb’s lettuce tossed in a pumpkin oil dressing, or you can cut it into smaller squares for a party-ready appetizer. Pair it with a glass of white wine or a cold cider, and you’ve got the perfect fall feast. Pro tip: If you’re feeling fancy, swap the olive oil for some pumpkin infused oil.

How to store
If you have any leftovers, store the flatbread in an airtight container in the fridge for up to two days. To reheat, simply pop it in the oven or air fryer until it’s crispy again. Avoid the microwave as it can make the crust soggy.

Hi, I'm Kimberly!

Hi, I'm Kimberly.

A passionate food lover who believes in the magic of homemade deliciousness that spreads love and warmth. Join me on this culinary adventure as I prepare wonderful dishes and let’s spread some happiness together!

Kimberly the Zett Signature

If you want to get to know me better, click here!


Pumpkin Tarte Flambée with Bacon Walnuts Gorgonzola & Lamb's Lettuce
„Let’s make a piece of happiness“
Print
clock clock iconcutlery cutlery iconflag flag iconfolder folder iconinstagram instagram iconpinterest pinterest iconfacebook facebook iconprint print iconsquares squares iconheart heart iconheart solid heart solid icon
Pumpkin Tarte Flambée with Bacon Walnuts Gorgonzola & Lamb's Lettuce

Pumpkin Tarte Flambée with Bacon Walnuts Gorgonzola & Lamb’s Lettuce


  • Author: Kimberly
  • Total Time: 45 minutes
  • Yield: 6 1x

Description

This recipe uses affiliate links which may earn commission for purchase made at no additional cost to you.

Recommended Equipment


Ingredients

Units Scale

DOUGH

  • 250 grams all-purpose flour
  • 125 milliliters cold water
  • 1 tbsp olive oil
  • 1 tsp salt

PUMPKIN TOPPING

  • 250 grams hokkaido pumpkin
  • 3 tbsp olive oil
  • 1/2 tsp dried thyme

BACON WALNUT TOPPING

  • 300 grams bacon
  • 30 grams walnuts
  • 2 tsp honey
  • 1/4 tsp dried rosemary
  • 1/4 tsp cayenne pepper
  • 70 milliliters dry white wine
  • salt & pepper to taste

OTHER TOPPINGS

  • 1 big red onion
  • 150 grams gorgonzola cheese
  • 200 grams creme fraiche
  • black pepper

SALAD

  • 200 grams lamb’s lettuce
  • 2 tbsp fresh chives
  • 4 tbsp pumpkin seeds

DRESSING

  • 4 tbsp olive oil
  • 2 tbsp apple cider vinegar
  • 2 tsp honey
  • 2 tsp Dijon mustard
  • salt & pepper to taste

Instructions

  1. For the dough, add water, salt, olive oil, and flour into a bowl. Stir with a spoon until just combined. Transfer the dough to a clean surface and knead by hand for about 3 minutes until smooth. Wrap the dough in plastic wrap and let it rest at room temperature for about 30 minutes.
  2. Slice the pumpkin into thin pieces and place them in a shallow dish. Rub with oil and thyme, then set aside to marinate.
  3. Cut the bacon into chunks (or use pre-cut bacon) and place it in a cold pan. Fry over medium heat until golden brown without adding extra fat. Once you’ve got a nice crispy base, add walnuts, rosemary, and cayenne pepper. Deglaze with white wine and let it simmer until the wine has evaporated. Add honey at the end, season with salt and pepper, and stir well. Set aside.
  4. For the other toppings, cut the red onion into thin half-rings and set them aside. Have the Gorgonzola, crème fraîche, and pepper ready. Preheat the oven to 250°C (482°F) on the grill setting.
  5. Divide the dough into two equal pieces. On a lightly floured surface, roll them out as thin as possible. Place each dough on a baking sheet lined with parchment paper and spread an even layer of crème fraîche over the top. Sprinkle freshly ground black pepper. Then, layer the other toppings: first the bacon-walnut mixture, followed by the pumpkin slices and onion rings, and finally small dollops of Gorgonzola. Bake in the oven for about 8-11 minutes or until the cheese has melted and the crust is golden and crispy.
  6. While the dough is baking, prepare the salad and dressing. Wash the lamb’s lettuce thoroughly and place it in a large bowl. Sprinkle pumpkin seeds on top and slice the chives into rings. Set some of the chives aside to garnish the tarte flambée.
  7. For the dressing, mix oil, apple cider vinegar, honey, Dijon mustard, salt, and pepper well. Add the dressing to the salad right before serving to avoid sogginess.
  8. Remove the tarte flambée from the oven, slice it up, and serve with the salad.
  • Cook Time: 45 min

Tomato Soup & Caramalized Onion Grilled Cheese Sandwich

Tomato Soup & Caramalized Onion Grilled Cheese Sandwich

Tomato Soup & Caramalized Onion Grilled Cheese Sandwich

Tomato Soup & Caramalized Onion Grilled Cheese Sandwich

October 6, 2024 by Kimberly

This is not your typical tomato soup…Imagine cozying up with a velvety, rich soup layered with additional bold flavors like carrots and red wine. Pair this with a gooey, melty onion-studded sandwich and you’ve got pure comfort with a gourmet twist.

80 MINUTES

EASY

VEGETARIAN

INT.

855 PER PORTION

COMFORT FOOD

CLASSICS

DINNER

AUTUMN
WINTER

INTRODUCTION

ABOUT THE RECIPE

There’s nothing like a comforting bowl of tomato soup – except when it’s taken to the next level! This version is bursting with extra flavors from sweet carrots, rich tomato paste, and a splash of red wine, making each spoonful deeply satisfying and a little more gourmet than your everyday soup. Paired with a gooey grilled cheese sandwich layered with caramelized onions, it’s the perfect cozy meal that will make you feel like you’re indulging in something truly special.

How to serve
Serve this soup hot, with a side of crispy grilled cheese fresh from the pan. The soft caramelized onions in the sandwich bring a sweetness that balances perfectly with the rich, slightly tangy soup. For an added touch, top your soup with a drizzle of cream or olive oil, or even some fresh herbs for a pop of color and flavor. This combo is perfect for a chilly evening in, or a quick but luxurious lunch.

How to store
Leftovers? No problem! Keep the soup in an airtight container in the fridge for up to three days, and reheat gently on the stove to preserve its rich flavors. The grilled cheese is best fresh, but you can revive it in a hot pan for a quick crisp-up.

Hi, I'm Kimberly!

Hi, I'm Kimberly.

A passionate food lover who believes in the magic of homemade deliciousness that spreads love and warmth. Join me on this culinary adventure as I prepare wonderful dishes and let’s spread some happiness together!

Kimberly the Zett Signature

If you want to get to know me better, click here!


Tomato Soup & Caramalized Onion Grilled Cheese Sandwich
„Let’s make a piece of happiness“
Print
clock clock iconcutlery cutlery iconflag flag iconfolder folder iconinstagram instagram iconpinterest pinterest iconfacebook facebook iconprint print iconsquares squares iconheart heart iconheart solid heart solid icon
Tomato Soup & Caramalized Onion Grilled Cheese Sandwich

Tomato Soup & Caramalized Onion Grilled Cheese Sandwich


  • Author: Kimberly
  • Total Time: 1 hour 20 minutes
  • Yield: 4 1x

Description

Recommended Equipment

  • large baking dish
  • sharp knife
  • cutting board
  • large pan
  • peeler
  • large pot
  • immersion blender (or stand mixer)

Ingredients

Units Scale

OVEN VEGGIES

  • 1 kilogram tomatoes (I used San Marzano)
  • 1 red bell pepper
  • 2 carrots
  • 2 shallots
  • 12 garlic cloves
  • 3 tbsp olive oil
  • salt

CARAMALIZED ONIONS FOR GRILLES CHEESE

  • 8 small white onions
  • 2 tsp butter
  • 1 tbsp balsamic vinegar
  • salt

SOUP BASE

  • 1 tsp butter
  • 4 small white onions
  • 1/2 tsp chili flakes
  • 2 tbsp tomato paste
  • 80 milliliters red wine

SOUP

  • 400 milliliters vegetable broth
  • 200 milliliters heavy cream (save some for garnish)
  • 10 grams fresh basil (save some for garnish)
  • salt, pepper & cayenne pepper to taste

GRILLED CHEESE

  • 8 slices bread of your choice (I used regular white flat breads)
  • 200 grams cheese of your choice (I used an cheddar & medium-aged gouda)
  • butter

Instructions

  1. Preheat your oven to 150°C / 300°F. Wash the tomatoes and bell peppers, then dry them well. Get a large baking dish ready. Quarter the tomatoes, remove the seeds from the bell peppers, and roughly chop them. Peel the carrots and cut them into large chunks too. Peel the shallots and garlic. Now, put everything in the baking dish, drizzle with a little olive oil and sprinkle some salt over the veggies. Toss them to coat evenly, then place the baking dish in the oven for 40 minutes. After 40 minutes, increase the temperature to 210°C / 410°F and roast for another 15 minutes.
  2. While the veggies are roasting, you can prepare the caramelized onions for the grilled cheese sandwiches. Peel the onions and slice them thinly. Add 1 teaspoon of butter to a large pan and let it melt. Add the onion slices, sprinkle a bit of salt on top, and cook on low heat, stirring regularly for about 10-15 minutes.
  3. Now, peel the onions for the soup base and cut them roughly. Set them aside. Pick the basil leaves from their stems, wash them, and dry them well. Set them aside too.
  4. After 10-15 minutes, the onions in the pan will have left some fond (browned bits) at the bottom. This is the time to add another teaspoon of butter and cook the onions for another 10-15 minutes. Once the onions are soft and golden brown, add a splash of balsamic vinegar and cook for another 1-2 minutes. Transfer the caramalized onions to a bowl and set the pan back on the stove to make the soup base.
  5. Add another teaspoon of butter to the pan and sauté the roughly chopped onions over medium heat. After a few minutes, add the chili flakes and stir well. After a few more minutes, stir in the tomato paste so that all the onions are coated evenly. Let it cook for a few minutes. Then, deglaze with the red wine and let it simmer until it reduces to a thick, creamy paste. Set the pan aside.
  6. Grab a large pot and transfer the roasted vegetables (along with any juices) into it once they’re done. Add the soup base from the pan, the vegetable broth, and the basil leaves. Use an immersion blender to blend everything until you reach the desired consistency. Finally, stir in the cream. Season the soup with salt, pepper, and cayenne to taste. Keep the soup on low heat and bring it to a simmer.
  7. Meanwhile, make the grilled cheese sandwiches. Heat a pan over low-medium heat. While the pan heats up, spread a thin layer of butter on the outside of each slice of bread. Grate the cheese. Place half of the buttered bread (butter side down) in the pan, then evenly distribute the cheese and caramelized onions on top. Cover the pan with a lid and wait for the cheese to start melting. Once it does, place the remaining slices of bread (butter side up) on top. Use a spatula to flip the sandwiches so they can brown on the other side.
  8. While the sandwiches are finishing, ladle the soup into bowls and optionally garnish with a drizzle of walnut oil, some cream, and fresh basil. Once the other side of the grilled cheese is crispy, take them out of the pan and cut them however you like – halves, triangles, strips, or small squares – depending on how you prefer them with your soup.
  • Cook Time: 80 min

Cinnamon Rolls

Cinnamon Rolls

Cinnamon Rolls

Cinnamon Rolls

October 2, 2024 by Kimberly

Get ready for the fluffiest, most melt-in-your-mouth rolls ever! Soft, buttery layers soaked in cream before baking—it’s like biting into a cloud of sweet cinnamon heaven with every bite.

100 MINUTES

INTERMEDIATE

VEGETARIAN

US AMERICAN

429 PER ROLL

SWEET
FLUFFY
CREAMY

BRUNCH

DESSERT

AUTUMN
WINTER

INTRODUCTION

ABOUT THE RECIPE

Imagine starting your day with soft, pillowy rolls that are bursting with cinnamon sweetness. The secret? A little heavy cream poured between the rolls before baking. It creates the dreamiest, most moist cinnamon rolls you’ll ever try. These rolls are more than just a treat – they’re a cozy, comforting hug wrapped in cinnamon-sugar goodness. Whether you’re baking them for a holiday morning or just because, they bring that extra something special to the table.

How to serve
These rolls are perfect fresh out of the oven, still warm and gooey. Drizzle them with a sweet vanilla glaze or a classic cream cheese frosting for that extra indulgent touch. Pair them with your morning coffee, or serve them up as a weekend brunch star alongside fresh fruit or a light mimosa. Trust me, they’re a hit at any gathering, or even for a solo cozy morning in!

How to store
To keep these rolls soft and fluffy, store them in an airtight container at room temperature for up to two days. Want to enjoy them later? Pop them in the fridge and reheat in the oven to bring back that fresh-baked magic.

Hi, I'm Kimberly!

Hi, I'm Kimberly.

A passionate food lover who believes in the magic of homemade deliciousness that spreads love and warmth. Join me on this culinary adventure as I prepare wonderful dishes and let’s spread some happiness together!

Kimberly the Zett Signature

If you want to get to know me better, click here!


Cinnamon Rolls
Cinnamon Rolls
Cinnamon Rolls
„Let’s make a piece of happiness“
Print
clock clock iconcutlery cutlery iconflag flag iconfolder folder iconinstagram instagram iconpinterest pinterest iconfacebook facebook iconprint print iconsquares squares iconheart heart iconheart solid heart solid icon
Cinnamon Rolls

Cinnamon Rolls


5 from 1 review

  • Author: Kimberly
  • Total Time: 100 min
  • Yield: 12 rolls 1x

Description

Recommended Equipment

  • small bowl
  • small whisk
  • large bowl
  • plastic wrap
  • two medium bowls
  • rolling pin
  • sharp knife
  • baking dish
  • oven

Ingredients

Units Scale

DOUGH

  • 500 grams bread flour (in Germany that’s Type 550)
  • 170 grams yogurt
  • 1/2 tsp salt
  • 1 egg
  • 130 milliliters full-fat milk
  • 1 tbsp white sugar
  • 21 grams fresh yeast

FILLING

  • 115 grams butter, room temperature
  • 150 grams brown sugar
  • 2 tbsp cinnamon
  • 1/4 tsp salt
  • 100 milliliters heavy cream
  • 50 milliliters cinnamon oil (optional)

FROSTING

  • 120 grams cream cheese
  • 120 grams powdered sugar
  • 50 grams butter, room temperature
  • 1 tsp vanilla extract
  • 1 tsp lemon juice

Instructions

  1. First, we activate the fresh yeast. Heat the milk to a temperature between 32°C and 38°C (90°F to 100°F). Add the white sugar and stir well. Crumble the fresh yeast into the warm milk and whisk it until fully dissolved. Let the mixture sit for 5 minutes. You should see small bubbles forming on the surface by then.
  2. Meanwhile, in a large bowl, add the flour, salt, yogurt, and egg. Pour in the yeast mixture and stir everything together with a wooden spoon. Transfer the dough to a clean work surface and knead by hand for about 10-15 minutes. The goal is to get a smooth and elastic dough. Using an electric mixer will cut the time in half. The dough is ready when you can stretch a piece thin enough to let light through without tearing. Place the dough back in the bowl and cover it with plastic wrap to keep it from drying out. Let it rise in a warm, draft-free spot for about an hour until it doubles in size.
  3. In the meantime, prepare the filling. Mix together softened butter, brown sugar, cinnamon, and a pinch of salt into a creamy mixture. Set it aside at room temperature.
  4. Next, prepare the frosting. Mix together cream cheese, powdered sugar, softened butter, vanilla extract, and lemon juice until smooth and creamy. Store in the fridge until ready to use.
  5. After the dough has risen for an hour, it should have doubled in size and is ready to work with. Prepare a large baking dish. Transfer the dough to a lightly floured, clean surface and roll it out to a 50×30 cm (about 20×12 inch) rectangle. Spread the butter-sugar-cinnamon mixture evenly over the dough. Then, cut the dough lengthwise into 12 equal strips. Roll each strip into a spiral and place them in the baking dish, forming 3 rows of 4 rolls. Let the rolls rise again for another 30 minutes.
  6. About 10 minutes before the rising time is up, preheat the oven to 190°C (375°F). Once the rolls have risen, pour the heavy cream and optional cinnamon oil in between the rolls. Bake for 20-25 minutes until the tops are golden brown. Be careful not to overbake them, as they may become dry.
  7. Remove the rolls from the oven and let them cool for about 10 minutes. Take the frosting out of the fridge and spread it evenly over the warm rolls. Enjoy!
  • Passive Time: 60 min
  • Cook Time: 40 min

Pumpkin Coconut Soup with Cinnamon Oil & Walnut Sage Grilled Cheese

Pumpkin Coconut Soup with Cinnamon Oil & Walnut Sage Grilled Cheese

Pumpkin Soup with Cinnamon Oil & Walnut Sage Grilled Cheese

Pumpkin Coconut Soup with Cinnamon Oil & Walnut Sage Grilled Cheese

September 30, 2024 by Kimberly

Warm, cozy vibes in every bite! This velvety pumpkin soup with a hint of cinnamon and a crunchy, nutty grilled cheese is basically the ultimate fall comfort food – perfect for cozy nights in.

45 MINUTES

EASY

VEGETARIAN

INT.

819 PER PORTION

CREAMY
COMFORT FOOD

EVERYDAY

SOUP

AUTUM

INTRODUCTION

ABOUT THE RECIPE

This dish is all about wrapping yourself in that cozy, autumn feeling. You’ve got a silky-smooth pumpkin soup with a subtle touch of cinnamon warmth and a grilled cheese that’s not just any sandwich – it’s loaded with a walnut sage pesto twist. This combo is basically fall in a bowl and a sandwich, giving you all the snuggly vibes while keeping things easy in the kitchen.

How to serve
I love serving this soup with the grilled cheese on the side or dipping it straight in for that dreamy melted cheese and creamy soup combo. You can also cut the sandwich into small bites for dipping if you’re feeling fancy. Sprinkle a little extra cinnamon oil on top of the soup for extra depth, and don’t forget some fresh sage leaves as garnish. It’s the perfect dish for a cozy night at home or even as a fun fall dinner party starter.

How to store
If you’ve got leftovers (lucky you!), store the soup in an airtight container in the fridge for up to 3 days. Reheat gently on the stove, adding a splash of water if it’s thickened. The grilled cheese is best fresh, but you can store the walnut sage pesto for about 4-5 days!

Hi, I'm Kimberly!

Hi, I'm Kimberly.

A passionate food lover who believes in the magic of homemade deliciousness that spreads love and warmth. Join me on this culinary adventure as I prepare wonderful dishes and let’s spread some happiness together!

Kimberly the Zett Signature

If you want to get to know me better, click here!


Pumpkin Soup with Cinnamon Oil & Walnut Sage Grilled Cheese
„Let’s make a piece of happiness“
Print
clock clock iconcutlery cutlery iconflag flag iconfolder folder iconinstagram instagram iconpinterest pinterest iconfacebook facebook iconprint print iconsquares squares iconheart heart iconheart solid heart solid icon
Pumpkin Soup with Cinnamon Oil & Walnut Sage Grilled Cheese

Pumpkin Soup with Cinnamon Oil & Walnut Sage Grilled Cheese


  • Author: Kimberly
  • Total Time: 45 min
  • Yield: 4 1x

Description

Recommended Equipment

  • large pot
  • sharp knife
  • cutting board
  • small & large pan
  • food processor
  • cheese grater
  • paper towels
  • hand blender

Ingredients

Units Scale

SOUP

  • 800 grams hokkaido pumpkin
  • 2 tbsp olive oil
  • 1 white onion
  • 2 garlic cloves
  • 500 milliliters vegetable broth
  • 200 grams coconut milk
  • 1 tsp ginger, grated
  • 1/2 nutmeg, grated
  • 1/4 tsp – 1/2 tsp cayenne pepper
  • salt & pepper to taste

PESTO

  • 50 grams walnuts
  • 25 grams olive oil
  • 25 grams parmesan
  • 10 fresh sage leaves
  • 1 garlic clove
  • 1/2 tsp lemon juice
  • salt & pepper to taste

SANDWICH

  • 4 slices bread of choice
  • 100 grams mozzarella
  • 80 grams cheddar
  • 20 grams butter

TOPPING


Instructions

PREPARATIONS

  • Here’s the recipe for cinnamon oil. You’ll need about 4-6 teaspoons for this recipe. If you don’t want to go through the hassle of making the cinnamon oil, you can just add 1/2 teaspoon of ground cinnamon to the soup.

INSTRUCTIONS

  1. First, we’ll prepare the soup. Heat some olive oil in a large pot. In the meantime, peel the onion and roughly chop it. Once the olive oil is hot, add the onion pieces and sauté on medium heat until soft.
  2. While that’s cooking, halve the pumpkin and scoop out the seeds. Cut the pumpkin into large chunks and add to the onions. Peel the garlic and ginger and grate them directly into the pot with the pumpkin. Let everything roast for about 10 minutes, then pour in the vegetable broth. Put the lid on and let it simmer on low heat for about 15-20 minutes until the pumpkin is very soft.
  3. Meanwhile, prepare the pesto. Toast the walnuts in a small pan without any added oil until golden brown. While the walnuts are toasting, finely grate the Parmesan and then add both to a food processor. In the same pan, heat a little olive oil and fry the sage leaves. Let the fried sage drain on a paper towel until crispy, then add it to the food processor as well. Peel the garlic clove and add it to the mix. Add lemon juice and, with the processor running, slowly drizzle in the olive oil. Season with salt and pepper, then set aside.
  4. For the grilled cheese sandwiches, grate the cheddar and press the mozzarella well in paper towels, then slice it thinly. Set aside.
  5. Once the pumpkin is soft, remove the pot from the heat and use a hand blender to purée everything. Add the coconut milk, nutmeg, cinnamon, and cayenne pepper, and season with salt and pepper. Put the pot back on the stove and keep it warm on the lowest heat with the lid on.
  6. Now, spread a thin layer of butter on the bread slices and place them butter-side down in a large pan. Spread 2 teaspoons of walnut-sage pesto on each slice. Distribute the cheese evenly on top of the pesto. Cook on low heat with the lid on for a few minutes until the cheese starts to melt. Once the bread is golden brown on the bottom, place another slice of bread, butter-side up, on top of the cheese and flip the sandwich. Cook for a few more minutes until the second side is golden brown as well.
  7. Serve the soup in deep bowls, topping it with cinnamon oil, cress, and chives. Cut the grilled cheese sandwiches into small squares and place them in the soup, or slice them into strips and serve them on the side.
  • Cook Time: 45 min

Crispy Chicken with Peanut Coconut Sauce & Edamame Slaw

Crispy Chicken with Peanut Coconut Sauce & Edamame Slaw

Crispy Chicken with Peanut Coconut Sauce & Edamame Slaw

Crispy Chicken with Peanut Coconut Sauce & Edamame Slaw

September 12, 2024 by Kimberly

Crunchy, juicy chicken strips paired with a creamy, nutty peanut coconut sauce and a fresh, zesty edamame slaw. It’s comfort food with a twist – bold, fresh, and absolutely irresistible!

30 MINUTES

EASY

OMNIVORE

ASIAN

665 PER PORTION

COMFORT FOOD

EVERYDAY

DINNER

ALL YEAR

INTRODUCTION

ABOUT THE RECIPE

This dish is the perfect mix of comfort and fresh, bold flavors. Juicy chicken strips with a golden, crispy coating are served alongside a creamy, dreamy peanut coconut sauce that has just the right balance of nuttiness and sweetness. Paired with a zesty edamame slaw, this combo is perfect for when you want something that feels indulgent but light and fresh at the same time. It’s all about that crunch, that sauce, and that fresh bite!

How to serve
These crispy chicken strips are best served hot and fresh out of the pan with the sauce on the side or drizzled on top – your call! The peanut coconut sauce adds that creamy richness, and the fresh edamame slaw balances everything with its light crunch. Perfect for a casual weeknight dinner, a weekend lunch, or even a fun appetizer for a gathering. Pair it with some steamed rice or fresh greens for an extra touch.

How to store
Store any leftover chicken and slaw separately in airtight containers in the fridge for up to 2 days. To keep the chicken crispy, reheat it in the oven instead of the microwave. The peanut coconut sauce can be kept for 3 days in the fridge.

Hi, I'm Kimberly!

Hi, I'm Kimberly.

A passionate food lover who believes in the magic of homemade deliciousness that spreads love and warmth. Join me on this culinary adventure as I prepare wonderful dishes and let’s spread some happiness together!

Kimberly the Zett Signature

If you want to get to know me better, click here!


Crispy Chicken with Peanut Coconut Sauce & Edamame Slaw
„Let’s make a piece of happiness“
Print
clock clock iconcutlery cutlery iconflag flag iconfolder folder iconinstagram instagram iconpinterest pinterest iconfacebook facebook iconprint print iconsquares squares iconheart heart iconheart solid heart solid icon
Crispy Chicken with Peanut Coconut Sauce & Edamame Slaw

Crispy Chicken with Peanut Coconut Sauce & Edamame Slaw


  • Author: Kimberly
  • Total Time: 30 min
  • Yield: 3 1x

Description

Recommended Equipment

  • sharp knife
  • cutting board
  • salad bowl
  • two small bowls
  • sieve
  • small pot with lid
  • three shallow bowls for breading
  • large pan

Ingredients

Units Scale

CRISPY CHICKEN

  • 400 grams chicken breast
  • 2 tbsp all-purpose flour
  • 1 egg
  • 4 tbsp panko
  • 4 tbsp bread crumbs
  • clarified butter for frying

PEANUT COCONUT SAUCE

  • 3 tbsp peanut butter
  • 1 tbsp soy sauce
  • 1/2 tbsp rice vinegar
  • 1 tsp sesame oil
  • 1 tbsp honey
  • juice of 1/2 a lemon
  • 1 garlic clove
  • 1 piece of ginger as the same size as the garlic clove
  • 1 tsp fish sauce
  • 1 tbsp sweet & sour sauce
  • 100 milliliters coconut milk
  • 1/2 tsp chili flakes

SLAW

  • 150 grams red cabbage
  • 150 grams white cabbage
  • 100 grams edamame
  • 1 spring onion
  • 2 tbsp cilantro

SLAW DRESSING

  • 1/2 tbsp sesame seeds
  • 1/2 tbsp rice vinegar
  • 1 tbsp honey
  • 2 tbsp soy sauce
  • 1/4 tsp ginger powder
  • 1/4 tsp garlic powder
  • juice of 1/2 a lemon

Instructions

  1. First, we’ll prepare the slaw. Slice the red and white cabbage into thin strips, wash them thoroughly, dry them, and put them in a salad bowl. Place the frozen edamame in a heatproof bowl and pour boiling water over them. Let them sit for 5 minutes. In the meantime, slice the spring onions into thin rings and pick the cilantro leaves off the stems, chopping them finely. Add both to the cabbage. Drain the edamame and add them to the slaw as well. Mix everything well and set it aside.
  2. Next, grab a small bowl to prepare the dressing for the salad. Mix rice vinegar, honey, soy sauce, lime juice, sesame seeds, garlic powder, and ginger powder. Don’t pour the dressing over the slaw just yet—set it aside for now.
  3. Now, let’s make the peanut coconut sauce. Peel and grate the garlic and ginger, then sauté them in some sesame oil in a small pot. Add the following ingredients: soy sauce, rice vinegar, honey, sweet & sour sauce, lime juice, fish sauce, chili, and coconut milk. Stir everything well. If the sauce is too thick, just thin it out with a little water. Keep it warm on very low heat with the lid on.
  4. Set up a breading station with flour, egg, and a mix of panko and breadcrumbs. Coat the chicken in flour, shake off the excess, then dip it in the egg, making sure it’s well-covered. Finally, press it into the panko and breadcrumb mixture, ensuring the breading sticks well on all sides. Fry the chicken in a large pan with a bit of clarified butter over medium heat until crispy and cooked through. Slice the chicken into strips.
  5. Pour the dressing over the slaw and mix everything well. Distribute the salad onto deep plates, then drizzle the peanut coconut sauce over it. Finally, place the crispy chicken strips on top of the sauce. Optionally, garnish with sesame seeds and spring onions.
  • Cook Time: 30 min