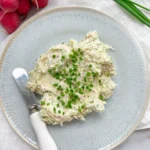
American Flag Pie

American Flag Pie

American Flag Pie

American Flag Pie

July 4, 2024 by Kimberly

Diving into the 4th of July with a sweet tribute to America! This patriotic cherry and blueberry pie captures the festive spirit in every delicious, colorful slice.

This website uses affiliate links which may earn commission for purchases made at no additional cost to you.

TOTAL TIME

4 hrs + 45 min

SERVES

8 pieces

DIET

vegan

EVERY RECIPE DESERVES

A Little Love Letter

Nothing screams 4th of July like an American Flag Pie! This vibrant cherry and blueberry pie isn’t just a treat for your taste buds—it’s a festive homage to the USA, perfect for any patriotic celebration.

Best served chilled or at room temperature, this pie stands out at your holiday table. Top it off with a scoop of vanilla ice cream or a drizzle of fresh cream to complement the tangy berries. Gather around for fireworks and a slice of Americana!

Keep any leftover pie covered in the refrigerator. It stays fresh and tasty for up to three days, ensuring you can enjoy the flavors of the holiday a little longer.

Hi, I'm Kimberly!

Hi, I'm Kimberly.

A hopeless romantic when it comes to food. Every recipe I share is a love letter to food itself. I’m so glad you’re here. Make yourself at home and stay a while.

Love,
Kimberly

Kimberly the Zett Signature

If you want to get to know me better,
click here!


American Flag Pie
American Flag Pie
American Flag Pie
American Flag Pie

LET’S MAKE A PIECE OF HAPPINESS

Print
clock clock iconcutlery cutlery iconflag flag iconfolder folder iconinstagram instagram iconpinterest pinterest iconfacebook facebook iconprint print iconsquares squares iconheart heart iconheart solid heart solid icon
American Flag Pie

American Flag Pie


5 Stars 4 Stars 3 Stars 2 Stars 1 Star

No reviews

  • Author: Kimberly
  • Total Time: 4 hrs + 45 min
  • Yield: 8-10 pieces

Description

GOOD TO HAVE ON HAND

  • 2 medium-sized bowls
  • plastic wrap
  • medium-sized pot
  • strainer + small bowl
  • whisk
  • oven
  • rolling pin
  • pie dish (28 cm / 11″)
  • sharp knife
  • star-shaped cutter
  • aluminum foil
  • pastry brush


Ingredients

Units Scale
PIE CRUST
  • 350 grams all-purpose flour
  • 50 grams white sugar
  • 130 grams unsalted butter, cold
  • 120 milliliters buttermilk, cold
  • pinch of salt
CHERRY FILLING
  • 700 grams morello cherries
  • 100 grams white sugar
  • 30 grams cornstarch
  • 1 tbsp butter
  • pinch of salt
BLUEBERRY FILLING
  • 250 grams blueberries
  • 50 grams white sugar
  • 1 tbsp cornstarch
  • 1 tbsp lemon juice
TOPPING
  • 1 tbsp full-fat milk
  • 1 tbsp brown sugar

Instructions

  1. Start by preparing the dough in a medium-sized bowl. Mix flour, sugar, and salt together. Then add cold butter, cut into small pieces, and crumble everything by hand until the butter is flaky. Add all the buttermilk and mix by hand until you have a somehow crumbly but firm dough. Wrap the dough in plastic wrap and chill it in the fridge for 30 minutes.
  2. Meanwhile, make the cherry filling in a medium-sized pot. Mix sugar, cornstarch, and salt together. Drain the cherries using a strainer, saving 1/2 cup of the juice, and add it to the pot. Cook over medium heat, letting it simmer until the mixture becomes creamy and the cloudiness disappears. Then add the cherries and a tablespoon of butter. Stir until the butter has melted. Set aside to cool.
  3. Next, prepare the blueberry filling. Wash the blueberries and place them in a medium-sized bowl. Add lemon juice, sugar, and cornstarch and mix well until all the blueberries are well coated.
  4. Preheat the oven to 215°C / 420°F and place the rack on the lowest shelf.
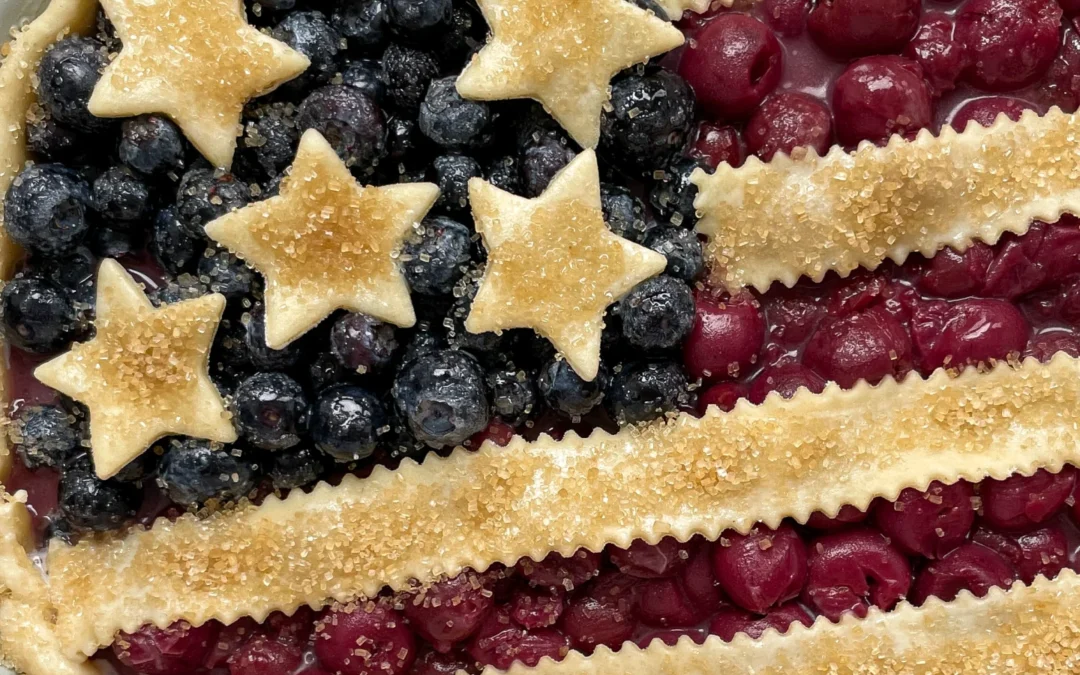
  5. Take the dough out of the fridge and shape it into a round ball. Place the dough on a heavily floured, clean work surface. Sprinkle more flour on the dough, then roll it out from the center using a rolling pin. The dough should be about 12 cm / 5″ larger in diameter than the pie dish. The dough itself should be 1cm / 1/3″ thick. Roll the dough around the rolling pin, then unroll it over the pie dish. Carefully fit the dough into the dish, then trim the excess edges. Tuck the edge inward to create a thicker top edge. From the remaining dough, cut out 4 long strips and 6 stars for the Stars & Stripes decoration. Set these aside.
  6. Take a piece of aluminum foil, fold it lengthwise, and then shape it into a right angle so it fits into the upper left quarter of the pie dish, acting as a divider between the fillings. Fill the 1/4 area with the blueberry mixture and the 3/4 area with the cherry filling. Remove and discard the foil.
  7. Distribute the cut-out stars over the blueberry filling and arrange the strips over the cherry filling. Trim the strips at the edges and fold them in. Brush the Stars & Stripes and the edges of the crust with a little milk and sprinkle with brown sugar.
  8. Bake the pie in the oven for 20 minutes. Then reduce the temperature to 175°C / 350°F and bake for another 25 minutes. Let the pie cool completely, which can take 3-4 hours as the filling sets upon cooling. Happy 4th of July!

Notes

The calorie information may vary depending on the product used, country and region.

  • Prep Time: 60 min
  • Passive Time: 3 hrs
  • Cook Time: 45 min

CRAVING MORE?

Follow along here & don’t forget to subscribe to my substack!

Green Herb Salad with Peas & Pickled Onions

Green Herb Salad with Peas & Pickled Onions

Green Herb Salad with Peas & Pickled Onions

Green Herb Salad with Peas & Pickled Onions

July 1, 2024 by Kimberly

Freshen up your meal with a vibrant green herb salad! Crunchy, zesty, and bursting with flavor, it’s a refreshing twist that’ll make your tastebuds dance.

This website uses affiliate links which may earn commission for purchases made at no additional cost to you.

TOTAL TIME

20 min

SERVES

4 portions

DIET

vegetarian

EVERY RECIPE DESERVES

A Little Love Letter

Elevate your salad game with this green herb salad, a lush blend of romaine and butter lettuce mixed with sweet peas and tangy pickled onions, all dressed in a light, herb-infused yogurt dressing. It’s a garden-fresh delight that captures the essence of spring in every bite.

This salad shines brightest when served fresh. Toss the crisp lettuces with the peas and pickled onions just before serving and sprinkle generously with dill, chives, and tarragon for that extra burst of freshness. It’s perfect alongside a grilled fish or as a standalone dish that’s both fulfilling and light.

Best enjoyed immediately, however, if you have leftovers, keep them separate in an airtight container in the fridge. The salad stays fresh for about two days, but it’s ideal to add the dressing just before serving to maintain crispness.

Hi, I'm Kimberly!

Hi, I'm Kimberly.

A hopeless romantic when it comes to food. Every recipe I share is a love letter to food itself. I’m so glad you’re here. Make yourself at home and stay a while.

Love,
Kimberly

Kimberly the Zett Signature

If you want to get to know me better,
click here!


Green Herb Salad with Peas & Pickled Onions

LET’S MAKE A PIECE OF HAPPINESS

Print
.tasty-recipe-responsive-iframe-container-1ddd40b1 { position: relative; overflow: hidden; padding-top: 56.3%; } .tasty-recipe-responsive-iframe-container-1ddd40b1 iframe { position: absolute; top: 0; left: 0; width: 100%; height: 100%; border: 0; } clock clock iconcutlery cutlery iconflag flag iconfolder folder iconinstagram instagram iconpinterest pinterest iconfacebook facebook iconprint print iconsquares squares iconheart heart iconheart solid heart solid icon
Green Herb Salad with Peas & Pickled Onions

Green Herb Salad with Peas & Pickled Onions


  • Author: Kimberly
  • Total Time: 20 minutes
  • Yield: 4

Description

GOOD TO HAVE ON HAND

  • sharp knife
  • cutting board
  • large salad bowl
  • medium-sized bowl
  • small bowl
  • measuring spoons


Ingredients

Units Scale
SALAD
  • 1 butter lettuce
  • 1 romaine lettuce
  • 100 grams frozen peas
  • 1 red onion
  • 1.5 tbsp fresh dill
  • 1.5 tbsp fresh chives
  • 1.5 tbsp fresh tarragon
DRESSING
  • 150 grams yogurt
  • 2 tbsp lemon juice
  • 2 garlic cloves
  • 1/2 tsp dijon mustard
  • salt & pepper to taste

Instructions

  1. Cut romaine and butter lettuce into bite-sized pieces, wash thoroughly, and spin dry. Place in a large salad bowl.
  2. Also wash chives, dill, and tarragon, dry, and finely chop. Add to the salad in the bowl.
  3. Fill a small bowl with frozen peas and pour hot water over them to cover and then set aside.
  4. In the meantime, in a separate bowl, prepare the dressing. Mix yogurt, lemon juice, peeled and pressed garlic cloves, and Dijon mustard together. Season with salt and pepper to taste.
  5. Drain the peas in a sieve and rinse with cold water. Let them drain and then add them to the salad bowl. Peel the red onion and slice it into very fine strips.
  6. Pour the dressing over the salad and top with the sliced red onions. Enjoy the salad immediately.

Notes

The calorie information may vary depending on the product used, country and region.

  • Cook Time: 20 min

CRAVING MORE?

Follow along here & don’t forget to subscribe to my substack!

Katsu Sando

Katsu Sando

Katsu Sando

Katsu Sando

June 29, 2024 by Kimberly

Sink your teeth into the ultimate Katsu Sando – the most popular Japanese sandwich! Crispy chicken, tangy red cabbage, and creamy kewpie mayo nestled between soft bread – every bite is a flavor explosion!

This website uses affiliate links which may earn commission for purchases made at no additional cost to you.

TOTAL TIME

40 min

SERVES

4 sandwiches

DIET

omnivore

EVERY RECIPE DESERVES

A Little Love Letter

Brace yourself for the crunch and savor of the Katsu Sando, a Japanese-inspired sandwich that’s taking the culinary world by storm. Featuring crispy panko-crusted chicken, this sandwich packs a punch with every layer of flavor.

Perfectly crispy and deliciously juicy, the Katsu Sando is best served immediately after assembly to maintain its textural contrast. Slice it in half to show off the beautiful layers of red cabbage slaw, green butter lettuce, creamy kewpie mayo and tonkatsu sauce.

While best enjoyed fresh, you can store the prepped ingredients separately in the fridge. The panko chicken can be kept for up to two days.

Hi, I'm Kimberly!

Hi, I'm Kimberly.

A hopeless romantic when it comes to food. Every recipe I share is a love letter to food itself. I’m so glad you’re here. Make yourself at home and stay a while.

Love,
Kimberly

Kimberly the Zett Signature

If you want to get to know me better,
click here!


Katsu Sando
Katsu Sando

LET’S MAKE A PIECE OF HAPPINESS

Print
.tasty-recipe-responsive-iframe-container-c8a4f608 { position: relative; overflow: hidden; padding-top: 56.3%; } .tasty-recipe-responsive-iframe-container-c8a4f608 iframe { position: absolute; top: 0; left: 0; width: 100%; height: 100%; border: 0; } clock clock iconcutlery cutlery iconflag flag iconfolder folder iconinstagram instagram iconpinterest pinterest iconfacebook facebook iconprint print iconsquares squares iconheart heart iconheart solid heart solid icon
Katsu Sando

Katsu Sando


  • Author: Kimberly
  • Total Time: 40 minutes
  • Yield: 4

Description

GOOD TO HAVE ON HAND

  • sharp knife
  • cutting board
  • medium-sized bowl
  • plastic wrap
  • meat mallet
  • two plates
  • three shallow dishes for breading
  • large frying pan
  • measuring spoons


Ingredients

Units Scale
  • 8 slices white toast
  • 40 grams kewpie mayo
  • 40 grams tonkatsu sauce
  • 250 grams chicken breast
  • 1.5 tbsp all-purpose flour
  • 1 egg
  • 3 tbsp panko bread crumbs
  • 3 tbsp regular bread crumbs
  • 50 grams clarified butter
  • 150 grams red cabbage
  • 1 tsp rice vinegar
  • 1/2 tsp sesame oil
  • 1/4 tsp salt
  • 4 butter lettuce leaves

Instructions

  • Cut the red cabbage into eighths and finely shred or slice one eighth. Place it in a medium-sized bowl and marinate with rice vinegar, sesame oil, and salt. Set aside.
  • Detach 4 leaves from the head of lettuce and wash thoroughly. Pat dry and set aside.
  • Halve the chicken breast lengthwise, then cut each half again crosswise. Place each piece between two layers of plastic wrap and pound to about 0.5 cm / 0.2″ thickness using a meat mallet. Lay the flattened meat on a plate.
  • Set up a breading station with three shallow dishes or bowls. Fill the first dish with 1.5 heaped tablespoons of wheat flour, crack an egg into the second dish and whisk it. In the third dish, mix together 3 heaped tablespoons each of panko and breadcrumbs. Coat each piece of chicken first in flour, shaking off excess, then dip in the egg, and finally, press into the breadcrumb mixture, ensuring it’s well coated on all sides. Place the breaded pieces side by side on a plate.
  • Heat clarified butter in a large frying pan and fry the breaded chicken pieces on both sides until crispy, about 3 minutes per side or until cooked through. Let the meat drain on kitchen paper.
  • Place half of the slices of bread flat on a clean work surface, then place a lettuce leaf on each. Top each with a piece of cooked chicken, followed by a zigzag pattern of Kewpie mayo and Tonkatsu sauce. Add about 2 tablespoons of red cabbage salad on top of the sauces. Finally, top the sandwiches with another slice of bread. If desired, trim the edges all around and cut the sandwiches in half in the middle with a sharp knife.

Notes

The calorie information may vary depending on the product used, country and region.

  • Cook Time: 40 min

CRAVING MORE?

Follow along here & don’t forget to subscribe to my substack!

Cannelloni

Cannelloni

Cannelloni

Cannelloni

June 27, 2024 by Kimberly

Imagine biting into perfectly baked Cannelloni, stuffed with rich, savory beef filling, all wrapped in a golden, crispy bechamel parmesan top. It’s comfort food heaven in every bite!

This website uses affiliate links which may earn commission for purchases made at no additional cost to you.

TOTAL TIME

2 hrs + 55 min

SERVES

6 portions

DIET

omnivore

EVERY RECIPE DESERVES

A Little Love Letter

Cannelloni, the classic Italian comfort dish, is a true crowd-pleaser with its hearty fillings and rich, creamy sauce. Perfect for gatherings, it promises to be the star of your dining table.

Serve your Cannelloni fresh out of the oven, topped with parmesan for that irresistible cheese pull. Accompany it with a simple green salad and a glass of delicious red wine for an authentic Italian dining experience. Whether it’s a cozy family dinner or a more festive occasion, cannelloni adapts to both, pleasing everyone who takes a bite.

Leftover Cannelloni can be refrigerated in an airtight container for up to three days, making it a fantastic make-ahead dish. Simply reheat in the oven until thoroughly warm and enjoy!

Hi, I'm Kimberly!

Hi, I'm Kimberly.

A hopeless romantic when it comes to food. Every recipe I share is a love letter to food itself. I’m so glad you’re here. Make yourself at home and stay a while.

Love,
Kimberly

Kimberly the Zett Signature

If you want to get to know me better,
click here!


Cannelloni
Cannelloni

LET’S MAKE A PIECE OF HAPPINESS

Print
.tasty-recipe-responsive-iframe-container-a815c77c { position: relative; overflow: hidden; padding-top: 56.3%; } .tasty-recipe-responsive-iframe-container-a815c77c iframe { position: absolute; top: 0; left: 0; width: 100%; height: 100%; border: 0; } clock clock iconcutlery cutlery iconflag flag iconfolder folder iconinstagram instagram iconpinterest pinterest iconfacebook facebook iconprint print iconsquares squares iconheart heart iconheart solid heart solid icon
Cannelloni

Cannelloni


  • Author: Kimberly
  • Total Time: 2 hrs 55 min
  • Yield: 6

Description

GOOD TO HAVE ON HAND

  • sharp knife
  • cutting board
  • vegetable peeler
  • large pot
  • baking dish
  • medium-sized pot
  • whisk
  • medium-sized bowl
  • piping bag


Ingredients

Units Scale
  • 24 cannelloni roles
  • 40 grams parmesan
  • 125 grams mozzarella
  • fresh basil
BEEF SAUCE
  • 500 grams minced beef
  • 500 grams minced pork
  • 700 milliliters beef stock
  • 1 tbsp butter
  • 1 tbsp clarified butter
  • 1 white onion
  • 1/2 celery stick
  • 1 carrot
  • 4 garlic cloves
  • 100 milliliters dry white wine
  • 800 grams canned tomatoes
  • 2 tbsp tomato paste
  • 1/2 tsp oregano
  • 1/4 tsp cinnamon
  • 1/4 tsp chili flakes
  • 1 tsp salt
  • 1/4 tsp black pepper
BECHAMEL SAUCE
  • 500 milliliters full-fat cow milk
  • 50 grams butter
  • 50 grams all-purpose flour
  • 1/8 tsp white pepper
  • 3/8 tsp salt
  • freshly grated nutmeg to taste

Instructions

  1. Peel the carrots, onion, and garlic, and chop them along with the celery into very small pieces. Set aside.
  2. Melt the clarified butter in a large pot and thoroughly brown the minced meat until a nice crust forms on the bottom. Then remove the meat from the pot and set it aside in a bowl.
  3. Now add the carrots, onion, garlic, and celery to the pot with 1 tbsp butter and sauté for about 5 minutes until soft. Deglaze with white wine and scrape up the crusty from the bottom. Return the ground meat to the pot along with tomato paste and a pinch of salt. Sauté for 1-2 minutes.
  4. Add beef broth and canned tomatoes and simmer over medium heat for about 1 hour without a lid. The consistency should be creamy-thick, neither too liquid nor too solid, just firm enough so that it doesn’t run out of the cannelloni when filling them. Now add oregano, salt, pepper, chili, and cinnamon, and season well. Set the filling aside to cool slightly.
  5. Meanwhile, prepare the béchamel sauce. The recipe can be found here: Béchamel Sauce. Once prepared, set it aside. Preheat the oven to 200°C / 392°F.
  6. Set up your cannelloni filling station. You’ll need the meat filling in the pot, a piping bag, a baking dish, and a spoon. Place about 4 tablespoons of the meat filling at the bottom of the baking dish. Fill your piping bag with a few tablespoons of the filling and pipe it into the cannelloni. I recommend not overfilling the piping bag to maintain control. Fill all the cannelloni one by one and arrange them in a single layer over the sauce in your baking dish. Spread the remaining sauce over the cannelloni.
  7. Next, pour the béchamel over the cannelloni, ensuring all gaps are filled with sauce. Top with grated mozzarella and Parmesan.
  8. Cover the baking dish with aluminum foil and bake for 30 minutes. After 30 minutes, remove the foil, increase the oven temperature to 220°C / 428°F, and bake for an additional 15 minutes until the cheese is crispy. Optionally, you can slice fresh basil into fine strips and sprinkle over the cannelloni.

Notes

The calorie information may vary depending on the product used, country and region.

  • Passive Time: 1 hour 45 min
  • Cook Time: 60 min

CRAVING MORE?

Follow along here & don’t forget to subscribe to my substack!

Turmeric Oil

Turmeric Oil

Turmeric Oil

Turmeric Oil

Jue 25, 2024 by Kimberly

Add a splash of sunshine to your meals! Turmeric oil is your go-to for an instant flavor lift and a hint of earthy zest. Perfect for any dish!

This website uses affiliate links which may earn commission for purchases made at no additional cost to you.

TOTAL TIME

50 min

SERVES

1 cup / 250 ml

DIET

vegan

EVERY RECIPE DESERVES

A Little Love Letter

Turmeric oil isn’t just a kitchen staple – it’s a game changer. Infused with the vibrant, health-boosting properties of turmeric, this oil adds both nutrition and a burst of color to your culinary creations.

Drizzle Turmeric Oil over your favorite salads, use it to sauté vegetables, or add a few drops to finish off your soups. It’s also fantastic for marinating proteins like chicken or fish, bringing a subtle, earthy depth to your dishes.

Store your Turmeric Oil in a cool, dark place to maintain its freshness. In a well-sealed bottle, it can last up to 1-2 weeks.

Hi, I'm Kimberly!

Hi, I'm Kimberly.

A hopeless romantic when it comes to food. Every recipe I share is a love letter to food itself. I’m so glad you’re here. Make yourself at home and stay a while.

Love,
Kimberly

Kimberly the Zett Signature

If you want to get to know me better,
click here!


Turmeric Oil
Turmeric Oil
Turmeric Oil
Turmeric Oil
LET’S MAKE A PIECE OF HAPPINESS
Print
.tasty-recipe-responsive-iframe-container-18c7571d { position: relative; overflow: hidden; padding-top: 56.3%; } .tasty-recipe-responsive-iframe-container-18c7571d iframe { position: absolute; top: 0; left: 0; width: 100%; height: 100%; border: 0; } clock clock iconcutlery cutlery iconflag flag iconfolder folder iconinstagram instagram iconpinterest pinterest iconfacebook facebook iconprint print iconsquares squares iconheart heart iconheart solid heart solid icon
Turmeric Oil

Turmeric Oil


  • Author: Kimberly
  • Total Time: 50 min
  • Yield: 250 ml / 1 cup

Description

RECOMMENDED EQUIPMENT

  • blender
  • medium-sized saucepan
  • whisk
  • a bowl which the medium saucepan fits into
  • 2 medium-sized bowls
  • 2 fine sieves
  • sealable container (oil bottle)
  • ice cubes
  • coffee filter

Ingredients

Units Scale
  • 50 grams fresh turmeric
  • 250 milliliters sunflower oil

Instructions

  1. Wash the turmeric, roughly chop it and put it into the blender. Pour in the oil. Blend on the highest setting until there are only tiny pieces of the turmeric left.
  2. Pour the mixture from the blender into a medium-sized pot and heat it over medium heat to a temperature of about 101°-104°C (213°-219°F), and maintain this temperature for the next 15 to 20 minutes. Stir occasionally, making sure the temperature remains steady and nothing gets burned.
  3. Prepare a bowl large enough to fit a medium-sized pot, and fill it with cold water and a handful of ice cubes. Also, hang a fine sieve strainer over one medium-sized bowl and another fine sieve strainer, with a coffee filter inside it, over another medium-sized bowl.
  4. Now, place the pot in the ice water and stir to cool the oil quickly. Once the oil is almost cold, remove the pot from the water and pour the oil into the prepared fine sieve to catch the coarse particles.
  5. Then, pour the oil into the second sieve, which is equipped with a coffee filter, to catch the remaining finer particles.
  6. Allow the oil to drip through for about 30 minutes or maybe less depending on how many remaining particles are in the coffee filter. Once all the oil has passed through the coffee filter, transfer the collected amount of oil into a sealable container or directly into an oil bottle. Store in the refrigerator for up to one week.

Notes

The calorie information may vary depending on the product used, country and region.

  • Prep Time: 5 min
  • Passive Time: 30 min
  • Cook Time: 15 min
CRAVING MORE?
Follow along here & don’t forget to subscribe to my substack!

Radish Cucumber Butter

Radish Cucumber Butter

Radish Cucumber Butter

Radish Cucumber Butter

June 24, 2024 by Kimberly

Whip up magic in your kitchen with this fresh, zesty butter blend! Perfect for giving a crunchy, creamy twist to any snack or sandwich.

This website uses affiliate links which may earn commission for purchases made at no additional cost to you.

TOTAL TIME

10 min

SERVES

4 portions

DIET

vegetarian

EVERY RECIPE DESERVES

A Little Love Letter

Radish cucumber butter combines the crisp freshness of radishes and cucumbers with creamy butter to create a spread that’s both light and invigorating. It’s a delightful way to add a burst of spring flavor to any dish.

This versatile butter is perfect slathered on warm bread, used as a savory topping for steamed vegetables, or as a refreshing twist in sandwiches. Its light, creamy texture and vibrant flavor profile make it an excellent complement to both casual and sophisticated culinary creations.

Keep the butter refrigerated in an airtight container. It maintains its best quality for up to 3 days, ensuring you can enjoy its fresh taste over several days.

Hi, I'm Kimberly!

Hi, I'm Kimberly.

A hopeless romantic when it comes to food. Every recipe I share is a love letter to food itself. I’m so glad you’re here. Make yourself at home and stay a while.

Love,
Kimberly

Kimberly the Zett Signature

If you want to get to know me better,
click here!


Radish Cucumber Butter

LET’S MAKE A PIECE OF HAPPINESS

Print
.tasty-recipe-responsive-iframe-container-4c2bffe2 { position: relative; overflow: hidden; padding-top: 56.3%; } .tasty-recipe-responsive-iframe-container-4c2bffe2 iframe { position: absolute; top: 0; left: 0; width: 100%; height: 100%; border: 0; } clock clock iconcutlery cutlery iconflag flag iconfolder folder iconinstagram instagram iconpinterest pinterest iconfacebook facebook iconprint print iconsquares squares iconheart heart iconheart solid heart solid icon
Radish Cucumber Butter

Radish Cucumber Butter


  • Author: Kimberly
  • Total Time: 10 minutes
  • Yield: 4

Description

GOOD TO HAVE ON HAND

  • sharp knife
  • cutting board
  • deep plate
  • paper towels
  • grater


Ingredients

Units Scale
  • 4 radishes
  • 1/4 cucumber
  • 125 grams butter
  • chives
  • salt to taste

Instructions

  1. Thoroughly wash the radishes, cucumber, and chives. Set up a deep plate and finely grate the radishes into it. Squeeze out the excess moisture from the grated radishes using paper towels. Repeat the process with the cucumber.
  2. Finely slice the chives and set them aside.
  3. Dry the plate, then add the softened butter to it. Incorporate the grated radishes and cucumber, mixing well. Season with salt and sprinkle the sliced chives on top.

Notes

The calorie information may vary depending on the product used, country and region.

  • Cook Time: 10 min

CRAVING MORE?

Follow along here & don’t forget to subscribe to my substack!