Sour Cream & Caramalized Onion Skillet Chicken

Sour Cream & Caramalized Onion Skillet Chicken

Sour Cream & Caramalized Onion Skillet Chicken

Sour Cream & Caramalized Onion Skillet Chicken

February 27, 2024 by Kimberly

Dive into the creamy delight of Sour Cream & Caramelized Onion Skillet Chicken! Perfect for a cozy dinner, this dish combines rich flavors with tender chicken. Enjoy the taste of home!

70 MINUTES

EASY

OMNIVORE

GERMAN

684 PER PORTION

CREAMY /
COMFORT FOOD

EVERYDAY

DINNER

AUTUMN / WINTER

INTRODUCTION

ABOUT THE RECIPE

Indulge in the comfort of Sour Cream & Caramelized Onion Skillet Chicken, your new favorite dinner solution! This one-pan wonder combines juicy chicken, rich sour cream, and sweet caramelized onions for a delightful meal. Perfect for busy weeknights or a comforting weekend treat, this easy-to-make dish brings gourmet flavors to your kitchen table without the fuss.

How to serve:
Serve this luscious Sour Cream & Caramelized Onion Skillet Chicken with fluffy mashed potatoes or steamed rice to soak up the creamy sauce. A side of green beans or a crisp salad adds freshness to your meal, creating a balanced and satisfying dinner. Don’t forget a slice of crusty bread for the ultimate comfort food experience, ideal for gathering family and friends around the table.

How to store:
Store any leftovers in an airtight container in the refrigerator for up to three days. Reheat gently in a pan over low heat to preserve the creamy texture and rich flavors of your delicious skillet chicken.

Hi, I'm Kimberly!

Hi, I'm Kimberly.

A passionate food lover who believes in the magic of homemade deliciousness that spreads love and warmth. Join me on this culinary adventure as I prepare wonderful dishes and let’s spread some happiness together!

Kimberly the Zett Signature

If you want to get to know me better, click here!


Sour Cream & Caramalized Onion Skillet Chicken
„Let’s make a piece of happiness“

INGREDIENTS

FOR 2 PORTIONS

CHICKEN

  • 400g chicken breasts (14 oz)
  • 1 tsp clarified butter

SOUR CREAM & ONION SAUCE

  • 1 tsp butter
  • 3 big onions
  • 4 garlic cloves
  • 200ml heavy cream
  • 200ml vegetable broth
  • 1/2 tsp dried thyme
  • 1/2 tsp dried marjoram
  • 1/2 tsp dried oregano
  • salt & pepper to taste

BEURRE MANIÉ

  • 1 tsp butter
  • 1 tsp all-purpose flour
Sour Cream & Caramalized Onion Skillet Chicken
}

ACTIVE: 5 min

PASSIVE: –

PREPARATIONS

Recommended Equipment
  • sharp knife
  • cutting board
  • small bowl
  • 2 pans (one of them ovenproof)
  • Peel, halve and cut the onions into thin semicircles.
  • Peel and finely chop or press the garlic.
  • Mix 1 teaspoon of butter and 1 teaspoon of flour in a small bowl until creamy. This is the beurre manié that you will use to bind the sauce later.
  • Preheat the oven to 200°C (400°F)
}

ACTIVE: 20 min

PASSIVE: 45 min

COOKING

1. In a large pan, heat 1 tablespoon of butter and sauté the onions until they have gained a bit of color, for about 15 minutes. Then add the garlic. Stir everything well and sauté for 1-2 minutes.

2. Now add the vegetable broth and deglaze the pan. Let everything simmer for about 5 minutes on medium heat. Now add the heavy cream. Stir everything well. Add the beurre manié, stir well and bring to a boil until the sauce has thickened. Now add salt, pepper, thyme, oregano, and marjoram, stir to combine, let it come to a boil briefly, and set aside.

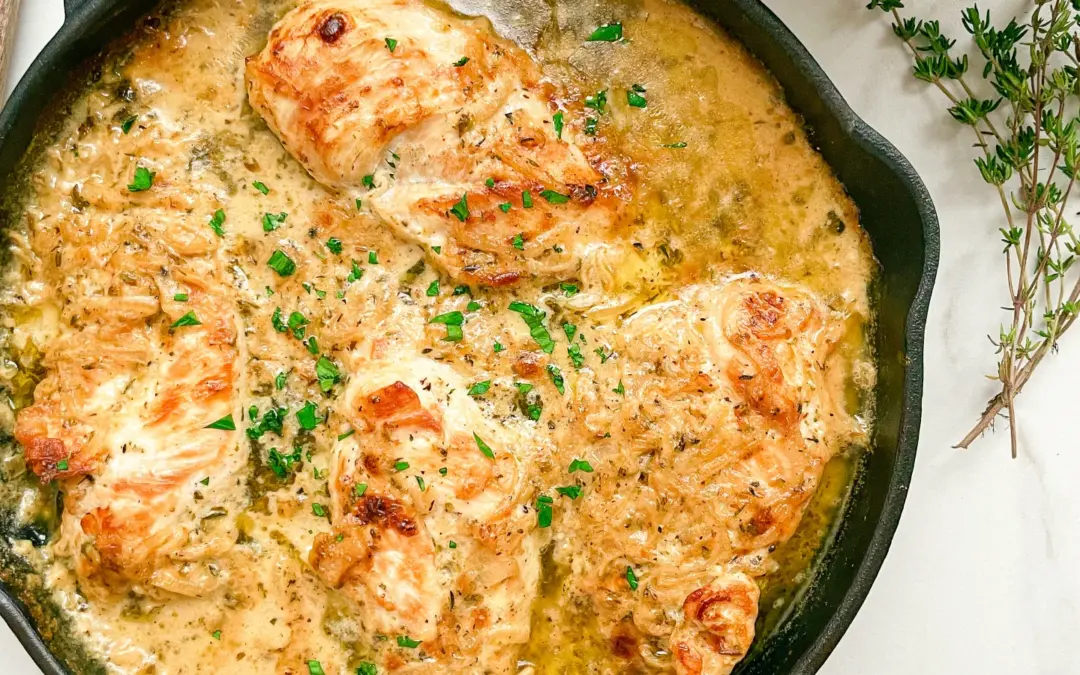
3. In an ovenproof skillet, heat 1 teaspoon of clarified butter and sear the chicken breasts on both sides. Do not fully cook the meat, as it will finish cooking in the oven and then become really tender.

4. Now spread the entire onion & cream sauce over and between the chicken in the skillet. Smooth out and bake in the oven uncovered for about 30 minutes until done.

5. Remove the skillet from the oven and enjoy the chicken and sour cream caramelized onions with rice, pasta, potatoes, mashed potatoes, or just simply bread.

NOTE: The calorie information may vary depending on the product used, country and region.

Chicory Pear Walnut Salad

Chicory Pear Walnut Salad

Chicorée Pear Walnut Salad

Chicory Pear Walnut Salad

February 25, 2024 by Kimberly

Discover the perfect blend of crisp chicory, juicy pears, and crunchy walnuts in this Chicory Pear Walnut Salad. A refreshing, nutritious delight that’s simple to make!

15 MINUTES

EASY

VEGETARIAN

INT.

238 PER PORTION

CRUNCHY
ZESTY

EVERYDAY

SALAD

ALL YEAR

INTRODUCTION

ABOUT THE RECIPE

Indulge in the fresh and invigorating flavors of my Chicory Pear Walnut Salad! This dish combines the crisp bitterness of chicory with the sweet juiciness of pears and the rich crunch of walnuts. It’s a salad that promises not just a feast for your taste buds but also a bounty of nutrients. This easy-to-prepare salad is an ideal addition to any meal.

How to serve:
Serve this vibrant Chicory Pear Walnut Salad as a refreshing starter or a light main course. It pairs wonderfully with grilled chicken, fish, or a crusty piece of bread for a fulfilling meal. The combination of flavors and textures makes it a hit at any gathering.

How to store:
To maintain freshness, store the salad in an airtight container in the refrigerator for up to one day. Keep the dressing separate to avoid sogginess. Enjoy it chilled for a rejuvenating and crisp taste experience every time.

Hi, I'm Kimberly!

Hi, I'm Kimberly.

A passionate food lover who believes in the magic of homemade deliciousness that spreads love and warmth. Join me on this culinary adventure as I prepare wonderful dishes and let’s spread some happiness together!

Kimberly the Zett Signature

If you want to get to know me better, click here!


Chicorée Pear Walnut Salad
„Let’s make a piece of happiness“

INGREDIENTS

FOR 4 PORTIONS AS SIDE / 2 PORTIONS AS MAIN

SALAD

  • 400g chicory (14 oz)
  • 2 pears
  • 2 tbsp walnuts
  • chives

DRESSING

  • 3 tbsp olive oil
  • 2 tbsp cold water
  • 1 tbsp lemon juice
  • 1 tsp Dijon mustard
  • 1 tsp honey
  • 1 garlic clove
  • salt & pepper to taste
Chicorée Pear Walnut Salad
}

ACTIVE: –

PASSIVE: –

PREPARATIONS

Recommended Equipment
  • sharp knife
  • cutting board
  • small bowl
  • small whisk
  • salad bowl
  • none
}

ACTIVE: 15 min

PASSIVE: –

COOKING

1. Roast the walnuts in a pan without adding any fat until golden brown and fragrant. Roughly chop them on a chopping board and add to the salad bowl.
2. Wash the chives, cut into small rolls and add to the salad bowl.
3. Halve the chicory lengthways and pluck off the leaves one by one. Wash and dry the leaves well and add to the salad bowl.
4. Wash the pears, cut in half and slice finely down to the stem and add to the other ingredients in the salad bowl. Mix everything well.
5. In a small bowl, mix the olive oil, lemon juice, water, honey, Dijon mustard and pressed garlic clove with a whisk to make a creamy dressing and season with salt and pepper to taste. Pour the dressing over the salad, mix well and serve immediately.
NOTE: The calorie information may vary depending on the product used, country and region.

Naan Bread

Naan Bread

Naan Bread

Naan Bread

February 24, 2024 by Kimberly

Discover the joy of homemade Naan Bread! Easy, fluffy, and delicious, it’s the perfect companion for any meal. Make it today and share the love!

80 MINUTES

EASY

VEGETARIAN

INDIAN

223 PER PORTION

FLUFFY

EVERYDAY

BREAD

ALL YEAR

INTRODUCTION

ABOUT THE RECIPE

Dive into the delightful world of Indian cuisine with this easy Naan Bread recipe! Perfect for beginners and seasoned chefs alike, my homemade Naan is fluffy and irresistibly delicious. Whether you’re pairing it with your favorite indian butter chicken or enjoying it as a snack, this versatile bread is a must-try. Get ready to impress your family and friends with your baking skills and bring a piece of India right to your dinner table.

How to serve:
Serve your freshly baked Naan Bread alongside a variety of dishes to elevate your dining experience. It pairs wonderfully with curries, soups, and stews, absorbing all the flavors beautifully. For a modern twist, use it as a base for pizza or as a wrap for sandwiches. Don’t forget to brush it with garlic butter and sprinkle some cilantro on top for that extra burst of flavor.

How to store:
To keep your Naan Bread fresh, wrap it in aluminum foil or store it in an airtight container at room temperature for up to 2 days. For longer storage, freeze the Naan, ensuring it’s well-wrapped, for up to a month.

Hi, I'm Kimberly!

Hi, I'm Kimberly.

A passionate food lover who believes in the magic of homemade deliciousness that spreads love and warmth. Join me on this culinary adventure as I prepare wonderful dishes and let’s spread some happiness together!

Kimberly the Zett Signature

If you want to get to know me better, click here!


Naan Bread
Naan Bread
Naan Bread

„Let’s make a piece of happiness“

INGREDIENTS

FOR 4 PORTIONS

DOUGH

  • 250g all-purpose flour (8.8 oz)
  • 1 tsp baking powder
  • 1/2 tsp salt
  • 30g full-fat yogurt (1 oz)
  • 125ml lukewarm water (1/2 cup)
Naan Bread
}

ACTIVE: 10 min

PASSIVE: 60 min

PREPARATIONS

Recommended Equipment
  • medium-sized bowl
  • cling film
  • frying pan
  • Mix the all-purpose flour, salt and baking powder in a medium-sized bowl. Add the yogurt and water and mix with a spatula or spoon to form a rough dough. Transfer the dough to a clean work surface and knead by hand to form a smooth dough. Wrap in cling film and leave to rest at room temperature for an hour.
    }

    ACTIVE: 10 min

    PASSIVE: –

    COOKING

    1. Unwrap the dough, divide it into four equal pieces on a floured surface and roll out each piece into a 20cm (8 inch) flatbread.

    2. Use a hot pan without fat to fry each side of the flatbread for about two to three minutes. Bubbles will form on the top side, which will fry until golden brown when turned over.

    NOTE: The calorie information may vary depending on the product used, country and region.

    Spicy Butter Chicken

    Spicy Butter Chicken

    Spicy Butter Chicken

    Spicy Butter Chicken

    February 22, 2024 by Kimberly

    Dive into the creamy delight of Spicy Butter Chicken with Coconut Cream! Perfect for those who love a rich, flavorful twist on a classic dish. Easy and satisfying!

    75 MINUTES

    INTERMEDIATE

    OMNIVORE

    INDIAN

    715 PER PORTION

    SPICY / CREAMY /
    COMFORT FOOD

    EVERYDAY

    DINNER

    AUTUMN / WINTER

    INTRODUCTION

    ABOUT THE RECIPE

    Indulge in the rich flavors of my spicy Butter Chicken. This dish offers a perfect balance of creamy texture and fiery spices, bringing a delightful twist to traditional Indian cuisine. Ideal for dinner parties or a cozy night in, this easy-to-make recipe promises to impress with its deep flavors and comforting warmth.

    How to serve:
    Serve this luxurious spicy Butter Chicken with fragrant basmati rice or warm naan bread to soak up the creamy sauce. Garnish with fresh cilantro and a squeeze of lemon for an added zest. This dish is perfect for spice lovers and can be easily adjusted to suit any palate, making it a versatile addition to your culinary repertoire.

    How to store:
    Store leftovers in an airtight container in the refrigerator for up to three days. Reheat gently, adding a splash of stock or coconut milk to retain the creamy texture. Avoid freezing as it may affect the sauce’s consistency.

    Hi, I'm Kimberly!

    Hi, I'm Kimberly.

    A passionate food lover who believes in the magic of homemade deliciousness that spreads love and warmth. Join me on this culinary adventure as I prepare wonderful dishes and let’s spread some happiness together!

    Kimberly the Zett Signature

    If you want to get to know me better, click here!


    Spicy Butter Chicken
    Spicy Butter Chicken
    Spicy Butter Chicken

    „Let’s make a piece of happiness“

    INGREDIENTS

    FOR 4 PORTIONS

    CHICKEN & MARINADE

    • 800g chicken breast (1.8 lbs)
    • 60g full-fat yogurt (2 oz)
    • 4 garlic cloves
    • 1 tbsp garam masala
    • 1 tsp cayenne pepper
    • 1 tsp ginger powder
    • 1 tsp cumin
    • 1 tsp turmeric
    • 1 tsp salt

    SAUCE

    • 300ml chicken broth (1 + 1/2 cup)
    • 400ml canned coconut milk (1 + 3/4 cup)
    • 100g tomato paste (3.5 oz)
    • 1 white onion
    • 4 garlic cloves
    • 1 fresh chili pepper
    • 2 tbsp butter
    • 1 tbsp clarified butter
    • 1 tbsp fresh ginger
    • 1 tbsp fresh cilantro
    • 1 tbsp garam masala
    • 1 tsp cumin
    • 1 tsp tumeric
    • salt & pepper to taste
    • lemon juice to taste

    SIDES & TOPPING

    • 200g basmati rice (7 oz)
    • 4 naan bread slices
    • 2 tsp fresh cilantro
    Spicy Butter Chicken
    }

    ACTIVE: 15 min

    PASSIVE: 30 min

    PREPARATIONS

    Recommended Equipment
    • sharp knife
    • cutting board
    • 2 medium sized bowls
    • rice cooker (or pot with lid)
    • large pan
    • medium sized pan
    • Peel all the garlic cloves.
    • In a medium sized bowl, prepare the marinade for the chicken. To do this, mix 60g (1/4 cup) yogurt, 1 tsp salt, 1 tsp ginger powder, 1 tsp turmeric, 1 tbsp garam masala, 1 tsp cumin, 1 tsp cayenne pepper and 4 of the minced garlic cloves together.
    • Roughly chop the chicken breast into bite-sized pieces and mix with the marinade. Place the bowl in the fridge for at least 30 minutes (overnight if you prefer) and let the meat marinate.
    • In the meantime, cut the white onion into small pieces and set aside.
    • Finely chop the remaining 4 cloves of garlic or put them through a garlic press later. Set aside.
    • Peel the fresh ginger and either grate finely or chop finely and set aside.
    • Finely chop the fresh chilli pepper and use all the seeds or just a few, depending on your preference. Set aside.
    • Pluck the coriander leaves from the stalks and chop finely. Set aside.
    • Wash the rice and cook in a rice cooker or pot with lid and keep warm.
    }

    ACTIVE: 15 min

    PASSIVE: 15 min

    COOKING

    1. Heat a large frying pan over medium heat and add 1 tbsp clarified butter. Take the chicken pieces out of the fridge and place directly in the hot pan. Fry on both sides until crispy. The chicken should still be on the raw side on the inside at this point, as it will finish cooking in the sauce later and become so tender this way. Remove the chicken from the pan into a bowl and set aside.

    2. Put the pan back on the stove, add 1 tsp of butter and fry the onion pieces over a medium heat until they are transparent and soft.

    3. Now add 100ml chicken broth and deglaze. Simmer over a medium heat until a kind of cream has formed, about 5 minutes.

    4. Now add 1 tbsp butter, 1 tbsp freshly chopped ginger, 1 tbsp garam masala, 1 tsp cumin, 1 tsp turmeric, the chopped chilli pepper and the 4 minced garlic cloves to the pan and fry for 30 seconds. Then add 100g (3.5 oz) tomato paste, mix everything together and fry again for 1-2 minutes. Reduce the temperature to low.

    5. Now add 200ml chicken broth and 400ml coconut milk. Stir everything well and bring the sauce to a boil. Add the chicken and meat juice to the sauce in the pan and simmer until the sauce thickens and the fat from the butter appears dark on the surface in some places. Small lakes of butter will form, so to speak. This will take about 15 minutes.

    6. Stir the butter chicken well and add another tablespoon of butter. Remove the pan from the heat and season to taste with salt, pepper, chopped coriander and lemon juice.

    7. Pour the rice into deep plates or bowls and top with the butter chicken. Serve with a slice of naan bread and fresh coriander.

    NOTE: The calorie information may vary depending on the product used, country and region.

    Basic Beef Broth

    Basic Beef Broth

    Basic Beef Broth

    Basic Beef Broth

    February 22, 2024 by Kimberly

    Discover the rich, savory goodness of homemade Beef Broth, a nourishing and flavorful base for soups and stews.

    7 HOURS

    EASY

    OMNIVORE

    INT.

    200 PER LITER

    COMFORT FOOD

    CLASSICS

    SOUP

    ALL YEAR

    INTRODUCTION

    ABOUT THE RECIPE

    Embrace the art of cooking with my homemade Beef Broth recipe. This nutritious and flavorful broth forms a versatile foundation for countless dishes. A perfect blend of simplicity and taste, this beef broth recipe guarantees a delightful culinary experience. It’s not just a recipe – it’s a journey to explore the depths of natural flavors, making it ideal for those who love to infuse health and taste in their cooking.

    How to serve:
    It’s perfect as a base for hearty soups and stews. Elevate your risottos, gravies, and sauces with its rich flavor. For a personalized touch, garnish with fresh herbs or a sprinkle of sea salt. Its versatility makes it a staple in any kitchen, promising a gourmet experience with every dish.

    How to store:
    Cool it down and refrigerate for up to 4-5 days. For longer storage, freeze it in portions. Use ice cube trays for easy, recipe-ready portions, ensuring freshness and convenience whenever you need it.

    Hi, I'm Kimberly!

    Hi, I'm Kimberly.

    A passionate food lover who believes in the magic of homemade deliciousness that spreads love and warmth. Join me on this culinary adventure as I prepare wonderful dishes and let’s spread some happiness together!

    Kimberly the Zett Signature

    If you want to get to know me better, click here!


    Basic Beef Broth
    Basic Beef Broth
    Basic Beef Broth

    „Let’s make a piece of happiness“

    INGREDIENTS

    FOR 2.5 LITERS (APPROX. 5 FL. PT.)

    VEGETABLES & BEEF

    • 2 kg beef bones (4.5 lbs)
    • 1 tsp clarified butter
    • 400g carrots (14 oz)
    • 2 onions
    • 200g celery root (7 oz)
    • 100g leek (3.5 oz)
    • 2 garlic cloves
    • 1 lemon

    HERBS & SPICES

    • 2 bay leaves
    • 1 stem thyme
    • 1 large bunch of parsley
    • 5 cloves
    • 1/2 tsp coriander seeds
    • 1 tsp black peppercorns
    • 22g salt (approx. 2 1/2 tsp)
    Basic Beef Broth
    }

    ACTIVE: 10 min

    PASSIVE: 30 min

    PREPARATIONS

    Recommended Equipment
    • sharp knife
    • cutting board
    • large pot with lid
    • large bowl (or a medium-sized pot)
    • fine sieve (or a kitchen towel)
    • Wash the beef bones well and roast in the oven at 250°C (480°F) for approx. 30 minutes.
    • Wash the carrots, celery and leek and cut everything into large pieces.
    • Wash the lemon and herbs too. Put the herbs aside.
    • Halve the onions and lemon.
    • Peel the garlic.
      }

      ACTIVE: 20 min

      PASSIVE: 6 hrs

      COOKING

      1. Heat 1 tsp clarified butter in a large pot and fry onions, lemon, carrots, celery, leek and garlic cloves until they leave a residue.

      2. Remove the bones from the oven and place on top of the vegetables. Fill up with 2.5-3 liters of cold water.

      3. Now add 2 dried bay leaves, 5 allspice seeds, 5 cloves, 1 teaspoon of black peppercorns, 1/2 teaspoon of coriander seeds and 1 bunch of parsley.

      4. Put the lid on and bring to the boil over a high heat. As soon as it boils, turn the heat down to the lowest setting and leave the liquid to simmer in the pot with the lid on for 6 hours.

      5. After 6 hours, remove the pot from the heat and leave to cool briefly. Remove the beef bones and any other coarse pieces of vegetables, as well as the herbs and spices.

      6. Strain the liquid through a fine sieve into a medium-sized pan. Allow the broth to cool completely and then skim off any fat floating on top. I put my pot in the fridge overnight. If there is still too much fat floating on top, the broth can be strained again through kitchen towels or a fine kitchen towel. The fat residue will then stick to it. Season the broth with salt. I season with 6-8g (approx. 1 teaspoon) per liter, depending on taste.

      7. The broth can now be processed directly or filled into jars.

      NOTE: The calorie information may vary depending on the product used, country and region.

      Cilantro Beef Cheese Enchiladas

      Cilantro Beef Cheese Enchiladas

      Cilantro Beef Cheese Enchiladas

      Cilantro Beef Cheese Enchiladas

      February 18, 2024 by Kimberly

      Savor the blend of cilantro, beef, and cheese in this delicious enchiladas. Perfect for family dinners, they’re a flavorful fiesta in every bite!

      60 MINUTES

      EASY

      OMNIVORE

      MEXICAN

      843 PER PORTION

      COMFORT FOOD

      EVERYDAY

      DINNER

      ALL YEAR

      INTRODUCTION

      ABOUT THE RECIPE

      Discover the magic of Cilantro Beef Cheese Enchiladas, a Mexican cuisine favorite that brings a world of flavors to your table. This easy beef enchiladas recipe, perfect for any family dinner, combines the freshness of cilantro with the heartiness of beef and the melt-in-your-mouth goodness of cheese. Dive into this homemade enchiladas experience that promises a savory fiesta in every bite!

      How to serve:
      Serve these flavorful dish hot, garnished with a sprinkle of fresh cilantro and a dollop of sour cream, Guacamole and Pico de Gallo. You can also accompany your cheesy enchiladas with a side of Mexican rice, refried beans, or a crisp green salad. These enchiladas are perfect for a quick dinner, offering a balance of taste and texture that appeals to everyone at the table.

      How to store:
      To store, let the enchiladas cool completely before covering them with foil. Refrigerate for up to 2 days. Reheat in the oven or microwave, making these savory enchiladas a delightful leftover treat that maintains its delightful flavors.

      Hi, I'm Kimberly!

      Hi, I'm Kimberly.

      A passionate food lover who believes in the magic of homemade deliciousness that spreads love and warmth. Join me on this culinary adventure as I prepare wonderful dishes and let’s spread some happiness together!

      Kimberly the Zett Signature

      If you want to get to know me better, click here!


      Cilantro Beef Cheese Enchiladas
      Cilantro Beef Cheese Enchiladas
      Cilantro Beef Cheese Enchiladas

      „Let’s make a piece of happiness“

      INGREDIENTS

      FOR 4 PORTIONS

      ASSEMBLY

      • 4 tortillas
      • 200g grated cheese (I used mozzarella & cheddar) (7 oz)

      ENCHILADA SAUCE

      • 400g minced beef (14 oz)
      • 125ml beef broth (1/2 cup)
      • 400g canned tomatoes (14 oz)
      • 1 white onion
      • 1 jalapeno
      • 2 garlic cloves
      • 1 tbsp oilve oil
      • 1/8 tsp chili flakes
      • 1 tsp cumin
      • 1 tsp smoked paprika
      • 1 tsp salt
      • 1/2 tsp black pepper
      • 1 tbsp cilantro


      TOPPINGS

      Cilantro Beef Cheese Enchiladas
      }

      ACTIVE: 15 min

      PASSIVE: –

      PREPARATIONS

      Recommended Equipment
      • sharp knife
      • cutting board
      • large pan
      • baking dish
      • Wash the cilantro, pluck the leaves from the stalks and chop finely.
      • Peel the garlic cloves.
      • Cut the onion into small pieces.
      • Finely dice the jalapeno.
      • Fry the tortillas in the pan over a medium heat on both sides so that they are still pliable and can be rolled. Set the tortillas aside with paper towels between each layer.
        }

        ACTIVE: 20 min

        PASSIVE: 25 min

        COOKING

        1. For the enchilada sauce, sauté the onions and jalapeno in a large pan over a medium heat until the onions are soft and slightly translucent. Next, add the crushed garlic, stir briefly and warm through.

        2. Now increase the heat and add the minced beef to the pan and fry until the meat has turned crispy dark brown.

        3. Now pour the beef stock and chopped tomatoes into the pan and stir everything together. Now add the spices: chili flakes, cumin, salt and pepper. Allow everything to reduce over medium heat for 10-15 minutes until the sauce has a bit thickened. As soon as the sauce has thickened, stir in 1 tablespoon of chopped coriander. Stir and set a side.

        4. In the meantime, you can prepare the guacamole and the pico de gallo.

        5. Preheat the oven to 250°C (480°F) and prepare a baking dish (my used measurements were 20x26cm (8×10 inch)) by pouring 3-4 tablespoons of the enchilada sauce onto the bottom of the baking dish and spread it out.

        6. Now place 2-3 tbsp of the enchilada sauce in the middle of each tortilla, sprinkle 2 tbsp of grated cheese over the top and then roll up the tortilla. Either do it the traditional way from the bottom to the top or fold both sides in at first and then roll from the bottom to the top.

        7. Now place the tortilla rolls in the baking dish on top of the sauce, spread the rest of the sauce on the tortillas and finish with the remaining cheese.

        8. Place the baking dish in the oven and bake for approx. 10-15 minutes or until the cheese has melted and is crispy golden brown in places.

        9. Take the baking dish out of the oven, divide the enchiladas between four plates and top with crème fraîche, pico de gallo, guacamole and fresh coriander.

        NOTE: The calorie information may vary depending on the product used, country and region.