Vanilla Sauce

Vanilla Sauce

Vanilla Sauce

Vanilla Sauce

May 29, 2024 by Kimberly

Discover the ultimate vanilla sauce that’s creamy, rich, and perfect for all your desserts. It adds a deliciously sweet touch to every bite!

This website uses affiliate links which may earn commission for purchases made at no additional cost to you.

TOTAL TIME

20 min

SERVES

4 portions

DIET

vegetarian

EVERY RECIPE DESERVES

A Little Love Letter

Vanilla sauce is a classic dessert topping that transforms any dish into a gourmet treat. This creamy and rich sauce is perfect for drizzling over cakes, pies, and fresh fruit. Easy to make and absolutely delicious, it’s a must-have recipe in your dessert repertoire.

Serve this delightful vanilla sauce warm over a slice of apple pie, or drizzle it over a bowl of fresh berries for a simple yet elegant dessert. It’s also fantastic on bread pudding, pancakes, or even ice cream. The possibilities are endless, making it a versatile addition to your kitchen.

To store your vanilla sauce, let it cool completely before transferring it to an airtight container. Keep it refrigerated and it will stay fresh for up to 2 days. When ready to use, gently reheat it on the stove or in the microwave, stirring occasionally to maintain its smooth texture or serve it chilled straight from the fridge.

Hi, I'm Kimberly!

Hi, I'm Kimberly.

A hopeless romantic when it comes to food. Every recipe I share is a love letter to food itself. I’m so glad you’re here. Make yourself at home and stay a while.

Love,
Kimberly

Kimberly the Zett Signature

If you want to get to know me better,
click here!


Vanilla Sauce
Apple Pie Rolls with Vanilla & Caramel Sauce & Milk Crumble

LET’S MAKE A PIECE OF HAPPINESS

Print
clock clock iconcutlery cutlery iconflag flag iconfolder folder iconinstagram instagram iconpinterest pinterest iconfacebook facebook iconprint print iconsquares squares iconheart heart iconheart solid heart solid icon
Vanilla Sauce

Vanilla Sauce


5 Stars 4 Stars 3 Stars 2 Stars 1 Star

No reviews

  • Author: Kimberly
  • Total Time: 20 minutes
  • Yield: 4

Description

GOOD TO HAVE ON HAND

  • 2 small pots
  • medium glass or aluminum bowl
  • whisk
  • spatula
  • sharp knife
  • cutting board


Ingredients

Units Scale
  • 150 milliliters heavy-cream
  • 150 milliliters whole-fat milk
  • 3 egg yolks
  • 50 grams brown sugar
  • 1 vanilla bean
  • pinch of salt

Instructions

  1. Pour the cream and milk into a pot. Slice the vanilla bean lengthwise, scrape out the seeds, and add both the seeds and the bean to the pot with the cream and milk. Bring to a simmer over medium heat, then set aside.
  2. Meanwhile, fill another pot halfway with water and bring it to a simmer.
  3. Separate the eggs and place the yolks in a medium glass or aluminum bowl. Add the brown sugar and salt, then whisk until smooth. The egg whites aren’t needed for this recipe, but you can use them to make delicious meringue.
  4. Remove the pot with the water from the heat and place the bowl with the egg-sugar mixture on top. The bottom of the bowl should not touch the water. Gradually add the hot cream to the egg-sugar mixture, whisking constantly. If you’re doing this alone, add a few tablespoons at a time and whisk quickly, repeating until about 3/4 of the cream is incorporated. This slow addition prevents the egg yolks from curdling by gently warming them. When most of the cream is added, pour in the rest and whisk.
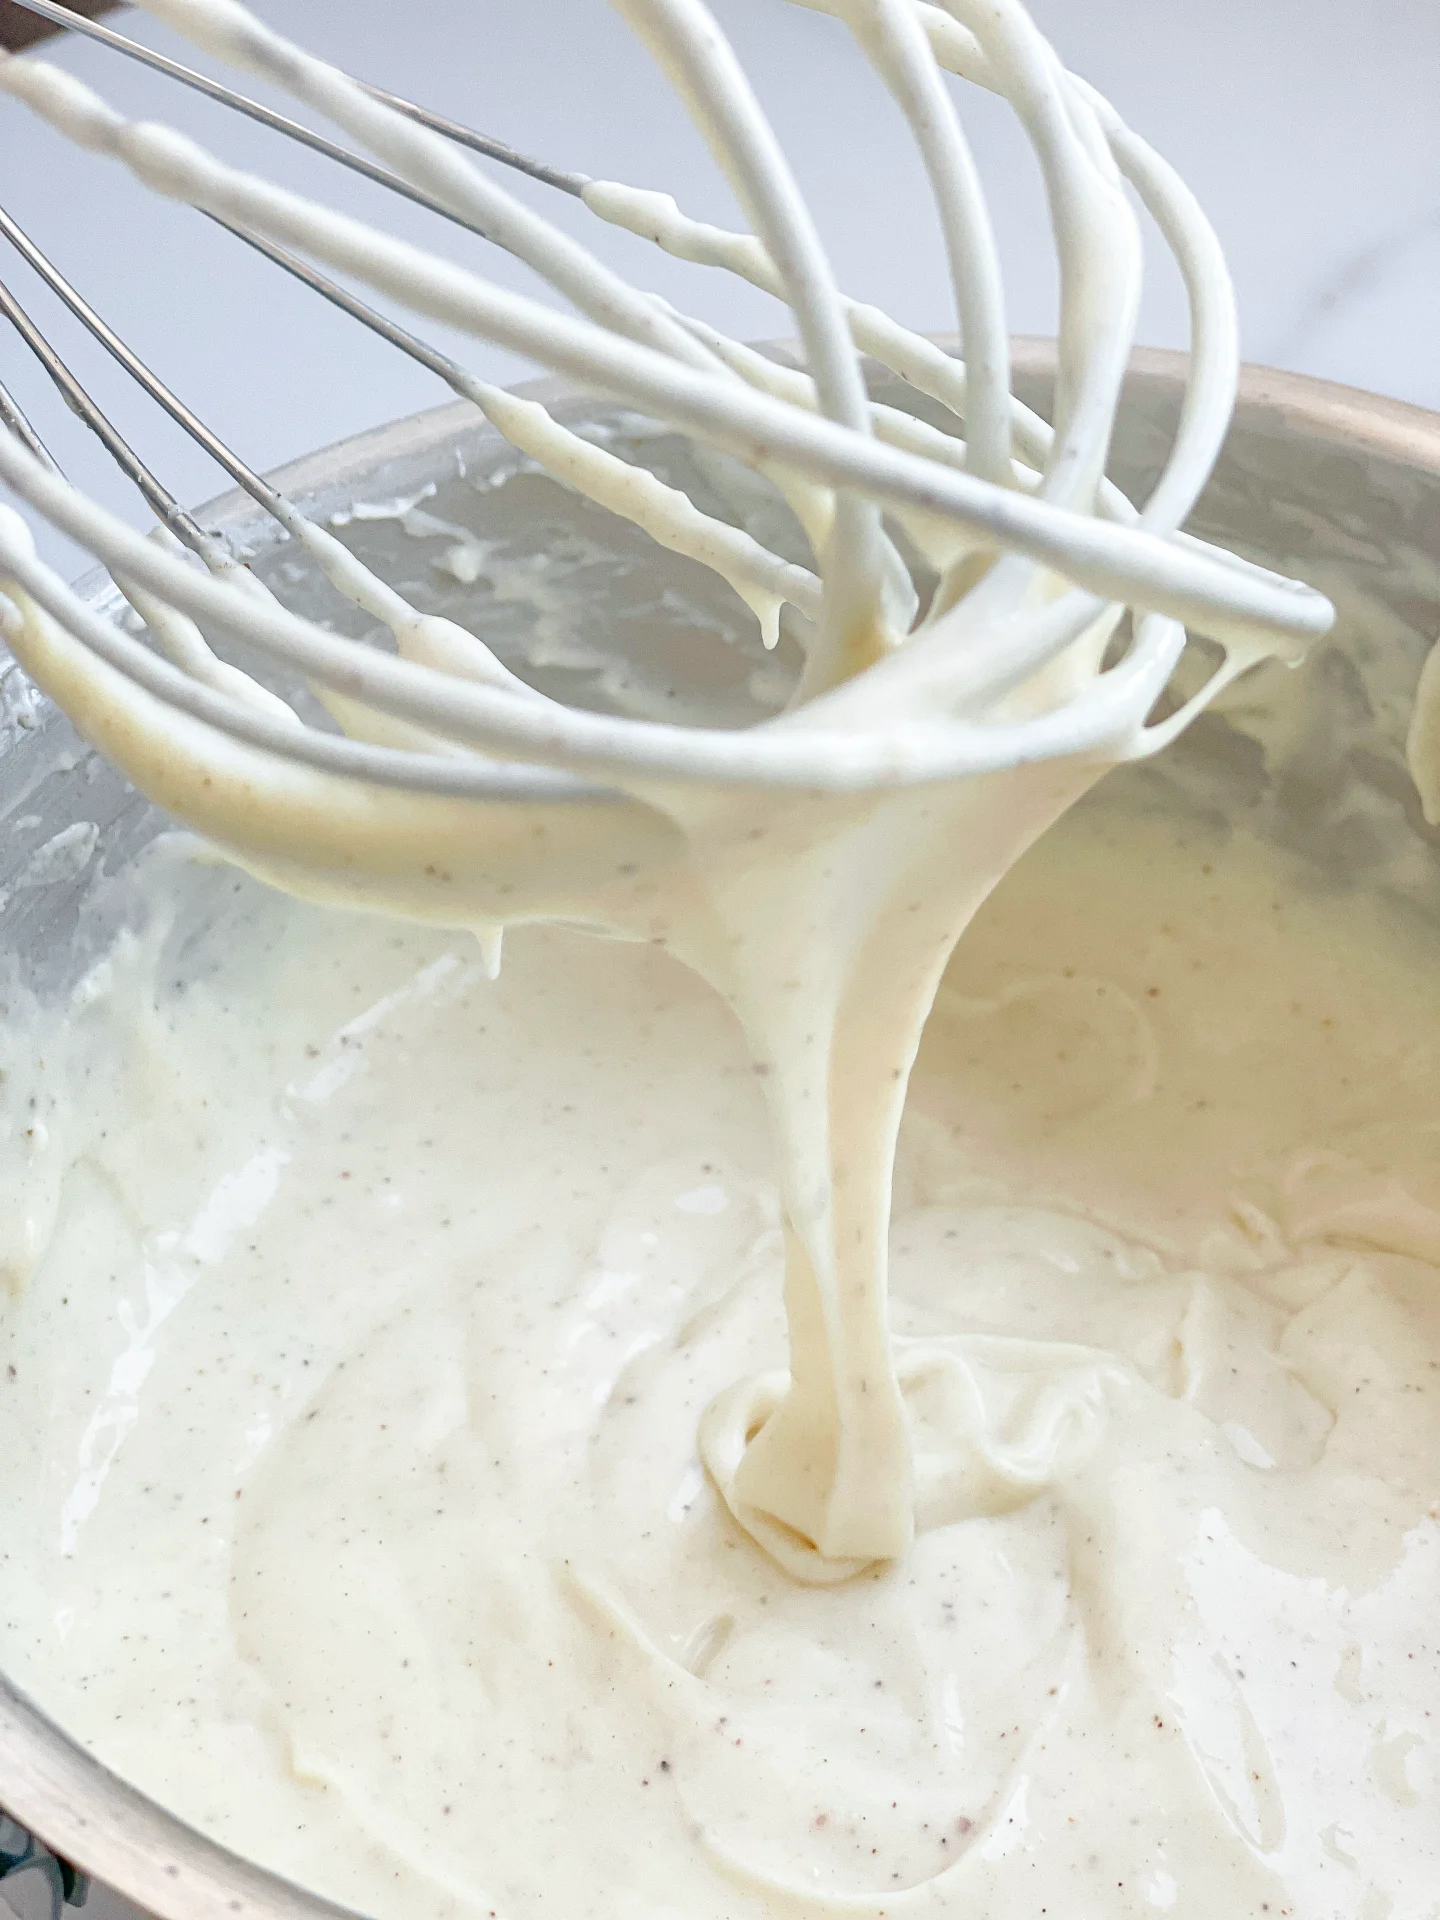
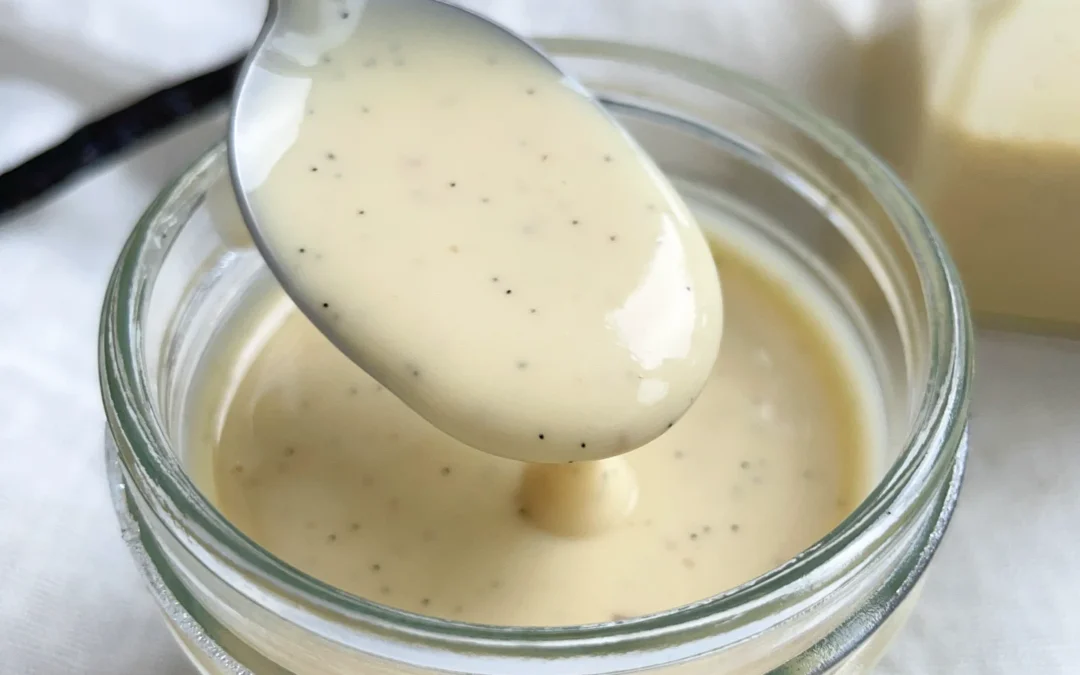
  5. Place the pot with the bowl back on the stove over medium-high heat and switch from the whisk to a spatula. The spatula incorporates less air, preventing the sauce from becoming foamy. Stir the mixture with the spatula until it thickens, about 10 minutes, or until it reaches 75°-79°C (167°-174°F).
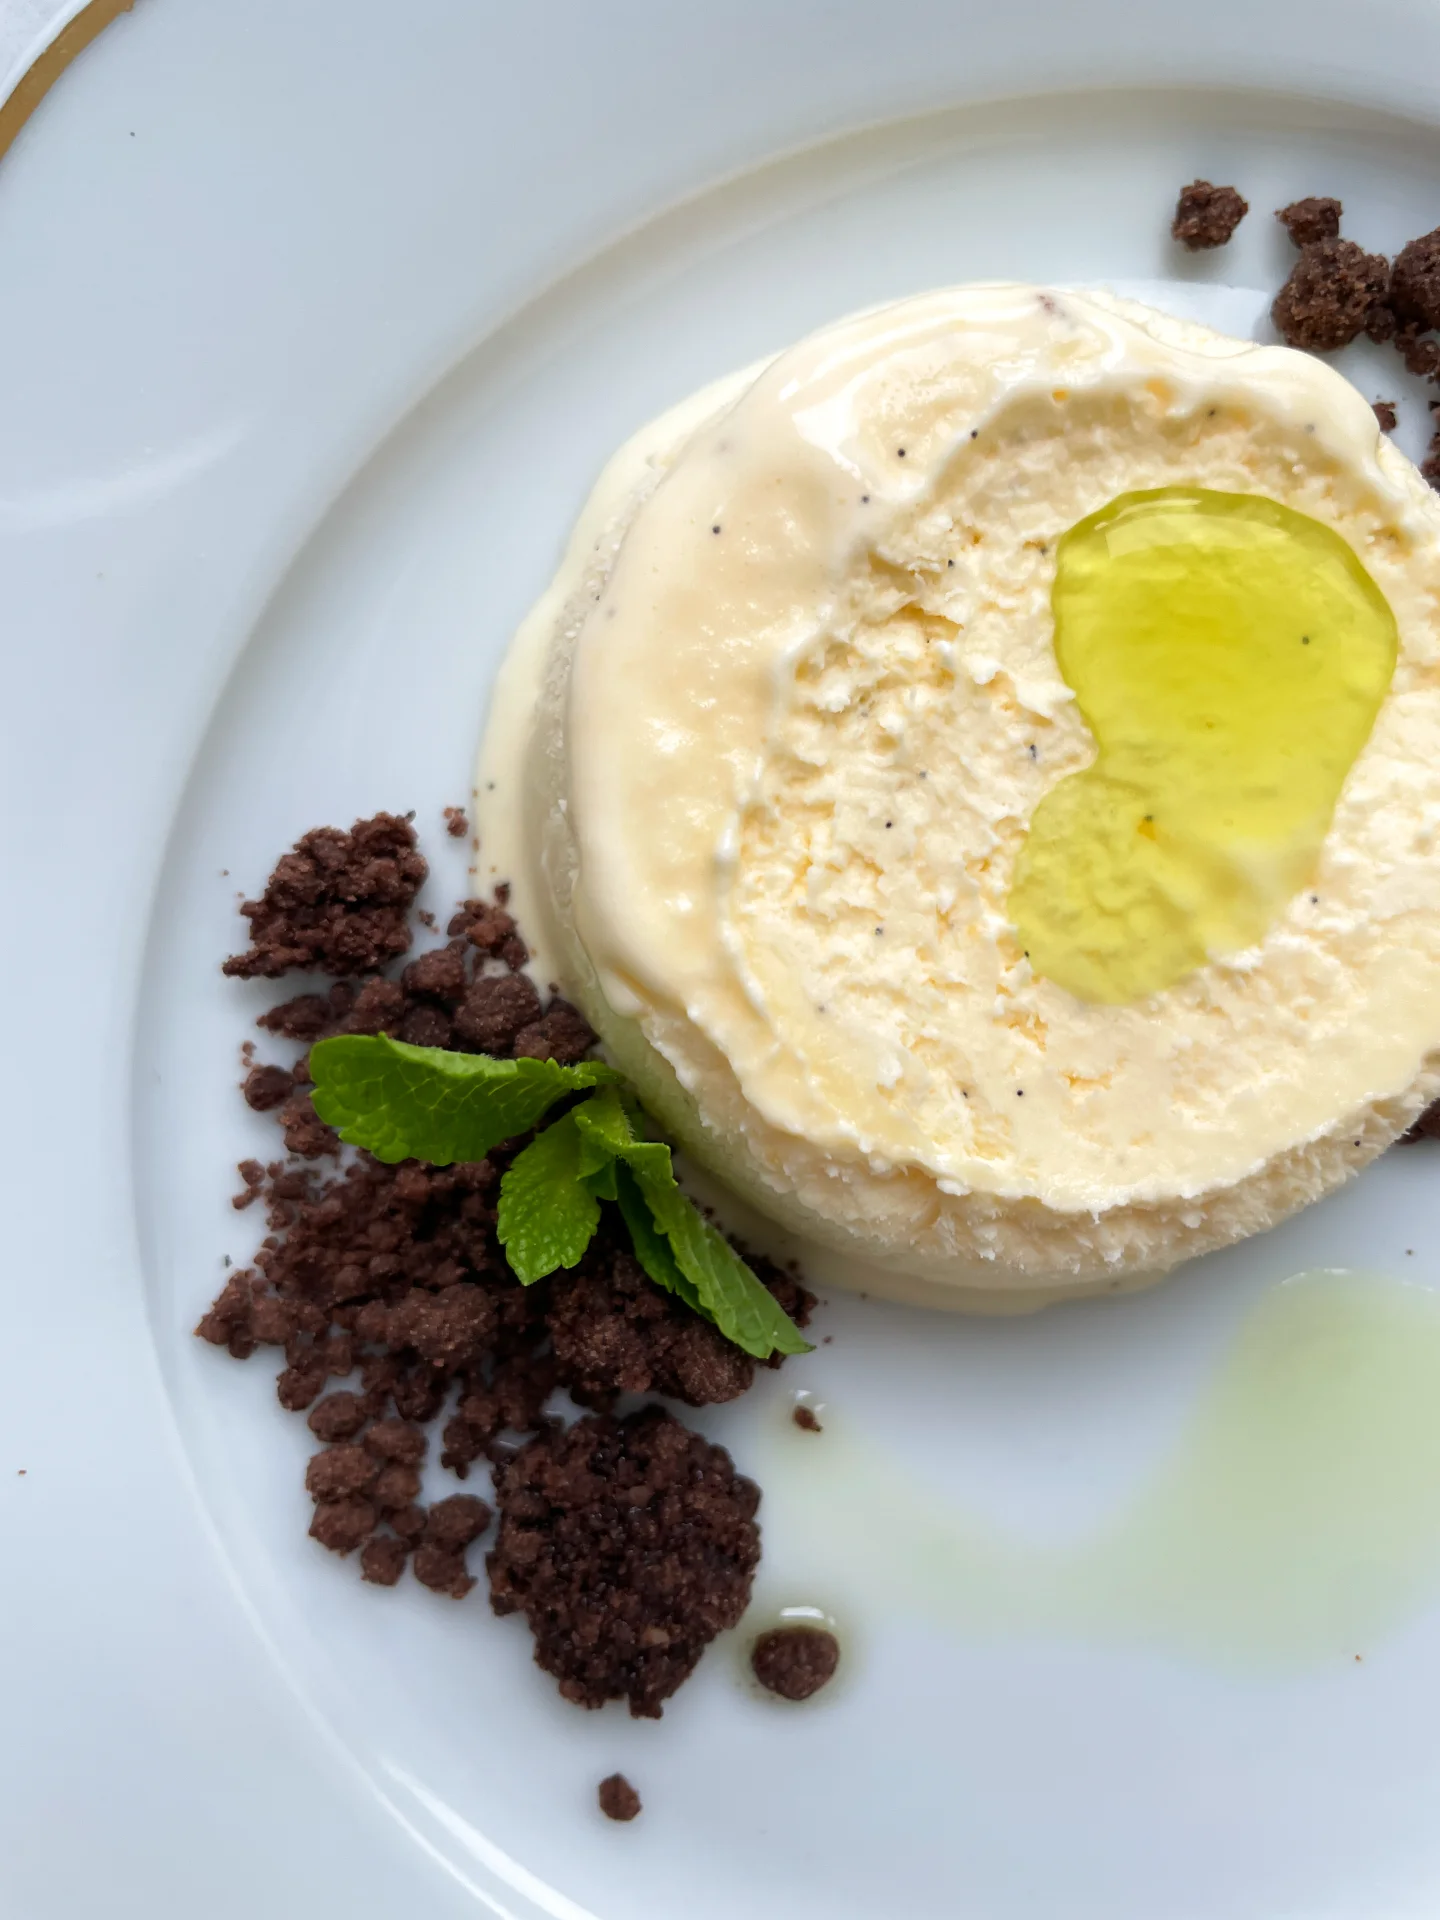
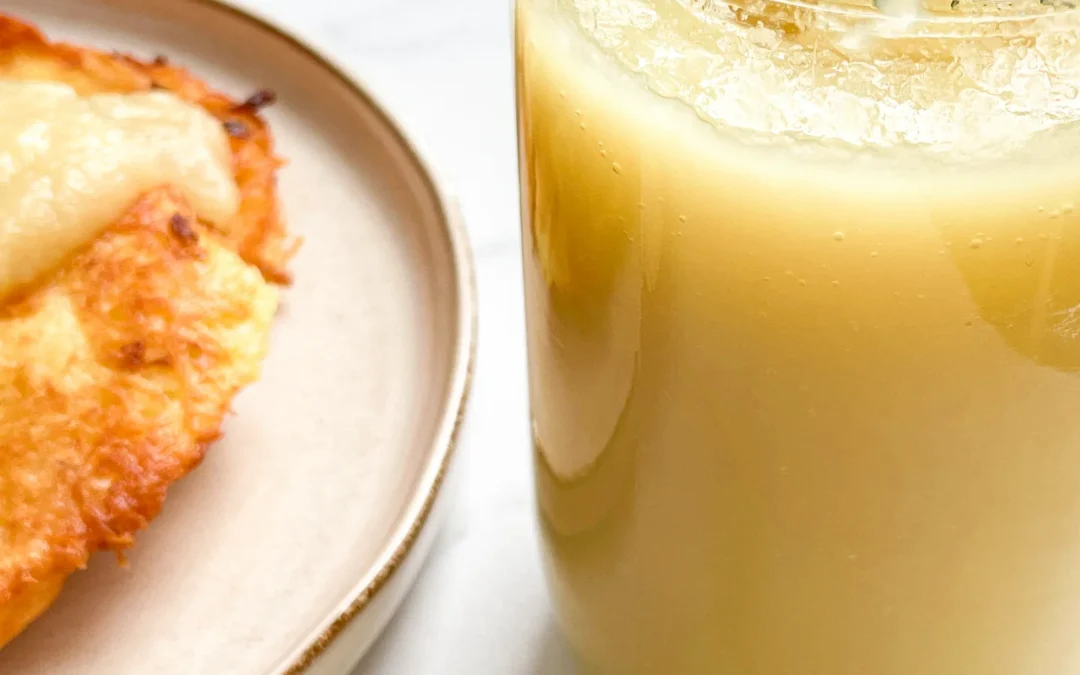
  6. To check if the sauce is ready, you can use a simple trick known as „coating the back of a spoon“ or as we say in Germany „pull off to the rose“. Dip a wooden spoon into the sauce and blow on the back of the spoon. If you see a pattern that resembles rose petals, the sauce is ready. A nice visual, right? So when you see this, remove the sauce from the heat. You can serve it now warm or let it cool. Enjoy this piece of happiness 🙂

Notes

NOTE: The calorie information may vary depending on the product used, country and region.

  • Cook Time: 20 min

CRAVING MORE?

Follow along here & don’t forget to subscribe to my substack!

Classic Scones

Classic Scones

Classic Scones

Classic Scones

May 26, 2024 by Kimberly

Indulge in the simple pleasure of classic scones – tender, buttery delights perfect for any tea time or breakfast. Bake a batch today and experience homemade comfort!

This website uses affiliate links which may earn commission for purchases made at no additional cost to you.

TOTAL TIME

40 min

SERVES

10 scones

DIET

vegetarian

EVERY RECIPE DESERVES

A Little Love Letter

Dive into the delightful world of classic scones, a quintessential British treat beloved across the globe. These buttery, flaky delights are the perfect companion to your afternoon tea or a cozy morning breakfast. With just a few simple steps, you can bring the taste of authentic English tea time into your home, impressing guests and treating yourself to a timeless culinary tradition.

Serve these classic scones fresh and warm, straight from the oven. Split them open and slather with clotted cream and strawberry jam for a traditional experience. Alternatively, enjoy them plain with a hot cup of tea or coffee. These versatile treats can also be customized with add-ins like raisins or chocolate chips, making each batch uniquely delicious and perfectly suited to your taste preferences.

Store leftover scones in an airtight container at room temperature for up to two days. For longer storage, wrap them tightly and freeze for up to three months. Simply reheat to regain that freshly baked warmth and texture.

Hi, I'm Kimberly!

Hi, I'm Kimberly.

A hopeless romantic when it comes to food. Every recipe I share is a love letter to food itself. I’m so glad you’re here. Make yourself at home and stay a while.

Love,
Kimberly

Kimberly the Zett Signature

If you want to get to know me better,
click here!


Classic Scones
Classic Scones

LET’S MAKE A PIECE OF HAPPINESS

Print
.tasty-recipe-responsive-iframe-container-aafc6d3b { position: relative; overflow: hidden; padding-top: 56.3%; } .tasty-recipe-responsive-iframe-container-aafc6d3b iframe { position: absolute; top: 0; left: 0; width: 100%; height: 100%; border: 0; } clock clock iconcutlery cutlery iconflag flag iconfolder folder iconinstagram instagram iconpinterest pinterest iconfacebook facebook iconprint print iconsquares squares iconheart heart iconheart solid heart solid icon
Classic Scones

Classic Scones


5 from 1 review

  • Author: Kimberly
  • Total Time: 40 min
  • Yield: 10

Description

GOOD TO HAVE ON HAND

  • box grater
  • medium-sized bowl
  • glass or small bowl
  • dough scraper / spatula
  • round cutter
  • pastry brush


Ingredients

Units Scale
  • 300 grams all-purpose flour
  • 35 grams white sugar
  • 4 tsp baking powder
  • 1/4 tsp salt
  • 90 grams butter
  • 1 egg
  • 160 milliliters milk
  • 2 tbsp milk for brushing

Instructions

PREPARATIONS

  • Place the butter in the freezer for 15 minutes.
  • Line a baking sheet with parchment paper.
  • Preheat the oven to 200°C/392°F.

INSTRUCTIONS

  1. In a medium-sized bowl, mix flour, sugar, baking powder, and salt. Grate the cold butter into the dry ingredients using a box grater.
  2. In a glass, whisk together the milk and egg and add to the other ingredients. Stir with a spoon until the mixture just comes together. Then, place the dough onto a clean work surface and fold it a few times with a dough scraper or a spatula, so that the dough comes together. It’s important not to use your hands for this, as the butter will soften too much, causing the dough to spread out during baking.
  3. Roll the dough into a rectangle about 30×20 cm and cut as many scones as possible using a round cutter. Fold the dough again and continue cutting out scones until all the dough is used. If you don’t have a cutter, you can also cut the dough into triangles. This amount of dough makes about 10 scones.
  4. Place the scones on the prepared baking sheet, spaced a little apart. Pour 2 tablespoons of milk into the glass and use the brush to spread it over the scones.
  5. Bake the scones in the oven for about 12 minutes. Then remove from the oven and enjoy immediately or let cool.

Notes

The calorie information may vary depending on the product used, country and region.

  • Prep Time: 2 min
  • Passive Time: 27 min
  • Cook Time: 10 min

CRAVING MORE?

Follow along here & don’t forget to subscribe to my substack!

Spicy Salmon Fried Sushi Rolls

Spicy Salmon Fried Sushi Rolls

Spicy Salmon Fried Sushi Rolls

Spicy Salmon Fried Sushi Rolls

May 24, 2024 by Kimberly

Spicy salmon meets crispy, fried perfection in this delightful dish. With a kick of heat, rich flavors, and a comforting texture, every bite offers a cozy yet exciting sushi experience.

This website uses affiliate links which may earn commission for purchases made at no additional cost to you.

TOTAL TIME

1 hr + 15 min

SERVES

4 portions

DIET

omnivore

EVERY RECIPE DESERVES

A Little Love Letter

Imagine if your favorite spicy tuna roll and a sizzling tempura dish had a delicious rendezvous. Sounds intriguing, right? Well, let me introduce you to Crispy Spicy Salmon Sushi Rolls. They’re bursting with the bold flavors of traditional sushi but transformed into a delightful fried sensation. Wrapped in a light, crispy coating with a kick of spicy salmon nestled inside, you’ve just discovered your new favorite dish. Perfect for any gathering or a tantalizing meal at home!

Serve these deep-fried spicy salmon rolls hot and crispy. Cut each roll into six even pieces for easy sharing. Drizzle them generously with the two sauces – a spicy mayo-Sriracha sauce and a sweet and savory soy-mirin sauce. For the final touch, sprinkle sesame seeds and thinly sliced spring onions over the top for a beautiful contrast in color and a burst of freshness. These rolls are packed with flavor, but if you enjoy a bit more heat, they also pair wonderfully with a dab of wasabi. This delightful combination of textures and tastes makes them a standout dish at any gathering.

Due to their crispy nature, it’s best to enjoy these spicy salmon rolls fresh. Once fried, they tend to lose their crunchiness if stored, so they are not recommended for later consumption. However, if you find yourself with leftovers, you can briefly re-fry them to bring back some of the crispiness. But really, these rolls are so delicious, consider it the perfect excuse to indulge and enjoy them all in one sitting!

Hi, I'm Kimberly!

Hi, I'm Kimberly.

A hopeless romantic when it comes to food. Every recipe I share is a love letter to food itself. I’m so glad you’re here. Make yourself at home and stay a while.

Love,
Kimberly

Kimberly the Zett Signature

If you want to get to know me better,
click here!


Spicy Salmon Fried Sushi Rolls

LET’S MAKE A PIECE OF HAPPINESS

Print
clock clock iconcutlery cutlery iconflag flag iconfolder folder iconinstagram instagram iconpinterest pinterest iconfacebook facebook iconprint print iconsquares squares iconheart heart iconheart solid heart solid icon
Spicy Salmon Fried Sushi Rolls

Spicy Salmon Fried Sushi Rolls


5 from 1 review

  • Author: Kimberly
  • Total Time: 75 min
  • Yield: 4

Description

GOOD TO HAVE ON HAND

  • sharp knife
  • cutting board
  • rice cooker (or pot)
  • three small pots (or one that you wash twice)
  • two small bowls
  • squeeze bottles (or tablespoons)
  • two medium-sized bowls
  • bamboo rolling mat (called Makisu)
  • plastic wrap
  • large bowl
  • whisk
  • drinking glass
  • two flat dishes
  • two forks
  • foam spoon


Ingredients

Units Scale
SUSHI RICE
  • 150 grams sushi rice
  • 2 tbsp rice vinegar
  • 1 tbsp white sugar
  • 1/2 tsp salt
LIGHT SAUCE
  • 50 grams mayonnaise
  • 10 grams Sriracha (or any other hot sauce you like)
DARK SAUCE
  • 50 grams soy sauce
  • 50 grams Mirin
  • 50 grams white sugar
TEMPURA BATTER
  • 100 grams all-purpose flour
  • 100 grams corn starch
  • 1 egg
  • 100 milliliters ice-cold water
  • 1/2 tsp salt
FILLING
  • 150 grams salmon filet
  • 2 tbsp Sriracha (or any other hot sauce you like)
OTHER INGREDIENTS
  • 2 full-sized Nori sheets
  • 70 grams Panko (or regular bread crumbs)
  • 500 milliliters deep-frying oil
  • sesame seeds
  • spring onions

Instructions

  1. Let’s start with the sushi rice: Wash the rice under cold water until the water runs clear. This is important as it removes all the starch and prevents the rice from becoming mushy. Now, place the rice in a rice cooker or pot and add 400ml (1 + 2/3 cup) of water. I use a little less than 1:1.5 ratio rice to water, as there’s still water left on the rice from washing. Let the rice cook.
  2. To get that authentic sushi flavor, the rice will be soaked in a sauce. For this, heat rice vinegar, sugar, and salt in a small pot until the sugar and salt have dissolved. Set aside to cool. As it cools, the sauce will thicken slightly.
  3. Now, let’s prepare the salmon filling. Rinse the salmon under cold water, dry it, then chop it into rough cubes. In a bowl, mix it with Sriracha, and it’s ready. Keep the salmon chilled until use.
  4. By now, the rice should be cooked. Transfer it to a medium-sized bowl and pour over the rice vinegar-sugar-salt sauce. Mix everything until the sauce is distributed and absorbed by the rice. Let the rice cool completely.
  5. Meanwhile, prepare the topping sauces. For the light sauce, simply mix mayonnaise and Sriracha, thinning it with a bit of water to make it easier to spread. For the dark sauce, heat soy sauce, Mirin, and sugar in a small pan or pot until the sugar dissolves. Set aside to cool. Once the sauce is cold, it will thicken a bit. I like to pour the sauces into squeeze bottles, but you can also spoon them over the sushi later or use them for dipping. Keep the sauces chilled until use.
  6. In the meantime, you can prepare your work surface. Take a bamboo rolling mat, also known as Makisu, and wrap it on both sides with a layer of plastic wrap. Press the ends well onto the mat. Then fill a medium-sized bowl with a little water, as you’ll need it for your fingers to prevent the rice from sticking to them. Then you’ll need a cutting board and a sharp knife to halve the rolls. Finally, halve your Nori sheets and set them aside.
  7. Once the rice is cold, you can start rolling. Place the Makisu with the sticks horizontally in front of you. Place a Nori sheet with the shiny, smooth side down on the bamboo mat. Dip your fingers in the water and take about 1 heaped tablespoon of rice, spreading it with your fingers on the Nori sheet. It takes a bit of practice to handle the rice, but just take your time and moisten your fingers again if it becomes difficult to spread the rice. I press and push it in the direction I want it. I leave about 1/2-1cm (0.2″-0.4″) free at the top edge of the Nori sheet. When the rice is evenly distributed, turn the Nori sheet over so that the rice side is now facing down. Place a strip of the salmon filling in the center of the Nori sheet, a bit more than a finger thick. Now roll the Nori sheet so that the bottom end lands directly over the salmon filling. Then press everything tightly from the outside, then close the roll with a twist and press again. Take the finished sushi roll and halve it on the cutting board. Proceed the same way with the other rolls and set them aside.
  8. Now prepare the tempura batter. Mix flour, cornstarch, and salt in a large bowl. In a glass, stir the egg and ice-cold water starting with 100ml (3.5 oz) of water, and pour it into the dry ingredients. Quickly whisk everything until it’s creamy. If the batter is too thick, add 1 tablespoon of water and stir. We aim for a creamy-thick consistency. Better too thick than too thin, so really only adjust the water carefully. It also depends on how much liquid the egg brings. Pour the batter into a flat dish. Do the same with the Panko.
  9. Now you can bread the rolls. Take two forks and place the first roll in the tempura batter, distributing the batter over the entire roll. You can also gently turn it. Lift it up and let the excess batter drip off. Now place the roll directly into the Panko and press it onto the roll with the forks. You should now have a compact roll where the batter adheres well and nothing drips. Bread the rolls one by one and set aside.
  10. Now heat the frying oil to 190°C/375°F in a small, deep pot. Make sure to use enough oil so that the rolls can be completely submerged. I used solid vegetable fat in block form. Once the temperature is reached, place two rolls at a time into the oil. Be careful as the oil may bubble when the rolls are added. It’s best to use a foam spoon for this. The temperature will then drop to about 175°C/347°F. Fry the rolls in the oil for a total of 5 minutes. Each roll only absorbs about 10g (1/3 oz) of fat. I weighed the fat before and after 😀 This is because the fat is hot enough to instantly seal the crust. That’s why it’s also important to bring the fat to the right temperature. If the fat is too cold, the roll absorbs more fat and becomes soggy and not crispy.
  11. When the rolls are done frying, remove them from the fat and let them drain on a rack and cool slightly. Cut the rolls into 6 pieces each and arrange them on a plate. Next, drizzle the light and dark sauces over the rolls in a zigzag direction. Finally, you can sprinkle some sesame and finely chopped spring onions as a topping.

Notes

The calorie information may vary depending on the product used, country and region.

  • Passive Time: 20 min
  • Cook Time: 55 min

CRAVING MORE?

Follow along here & don’t forget to subscribe to my substack!

Chocolate Chip Cookie Dough

Chocolate Chip Cookie Dough

Chocolate Chip Cookie Dough

Chocolate Chip Cookie Dough

May 18, 2024 by Kimberly

Obsessed with cookie dough? This easy, edible chocolate chip version is your new go-to treat! Safe to eat and super delicious – perfect for any sweet craving!

This website uses affiliate links which may earn commission for purchases made at no additional cost to you.

TOTAL TIME

5 min

SERVES

4 portions

DIET

vegetarian

EVERY RECIPE DESERVES

A Little Love Letter

This edible chocolate chip cookie dough is a game-changer! It’s safe to eat, incredibly easy to make, and ridiculously tasty. Whether you’re snacking straight from the bowl or adding it to your favorite desserts, this no-bake cookie dough will quickly become your new favorite treat. Ready to dive in? Let’s whip up this sweet, satisfying delight!

Enjoy it straight from the bowl with a spoon, or roll it into bite-sized balls for a fun, shareable treat. For an extra indulgent experience, pair it with ice cream or spread it on a warm brownie. You can even use it as a topping for your favorite desserts, like cupcakes or cheesecakes, to add a delightful cookie dough twist.

Store your edible chocolate chip cookie dough in an airtight container in the refrigerator for up to a week. For longer storage, freeze it for up to three months. Simply thaw in the fridge before enjoying your sweet, ready-to-eat treat.

Hi, I'm Kimberly!

Hi, I'm Kimberly.

A hopeless romantic when it comes to food. Every recipe I share is a love letter to food itself. I’m so glad you’re here. Make yourself at home and stay a while.

Love,
Kimberly

Kimberly the Zett Signature

If you want to get to know me better,
click here!


Chocolate Chip Cookie Dough

LET’S MAKE A PIECE OF HAPPINESS

Print
.tasty-recipe-responsive-iframe-container-7345ae1f { position: relative; overflow: hidden; padding-top: 56.3%; } .tasty-recipe-responsive-iframe-container-7345ae1f iframe { position: absolute; top: 0; left: 0; width: 100%; height: 100%; border: 0; } clock clock iconcutlery cutlery iconflag flag iconfolder folder iconinstagram instagram iconpinterest pinterest iconfacebook facebook iconprint print iconsquares squares iconheart heart iconheart solid heart solid icon
Chocolate Chip Cookie Dough

Chocolate Chip Cookie Dough


  • Author: Kimberly
  • Total Time: 5 minutes
  • Yield: 4
  • Diet: Vegetarian

Description

GOOD TO HAVE ON HAND

  • two small bowls
  • spoon
  • microwave or oven


Ingredients

Units Scale
  • 40 grams soft butter
  • 40 grams white sugar
  • 1/4 tsp vanilla extract
  • pinch of salt
  • 75 grams all-purpose flour
  • 2 tbsp milk
  • 35 grams semi-sweet chocolate

Instructions

  1. Microwave the flour in one of the bowls on high for 45 seconds. The flour should reach about 75°C/165°F to kill any bacteria and make it safe to eat raw. If you don’t have a microwave, you can bake the flour in the oven at 170°C/338°F for about 10 minutes.
  2. Meanwhile, mix the softened butter, sugar, vanilla extract, and salt until creamy. Add the milk and mix again.
  3. Now, add the flour and mix everything into a cookie dough.
  4. Fold in the chocolate chips and either snack on it right away or chill the bowl in the fridge for 10-15 minutes for a firmer texture.

Notes

The calorie information may vary depending on the product used, country and region.

  • Cook Time: 5 min
  • Category: DESSERT
  • Method: NO BAKE
  • Cuisine: US AMERICAN

CRAVING MORE?

Follow along here & don’t forget to subscribe to my substack!

Apple Crumble

Apple Crumble

Apple Crumble

Apple Crumble

December 3, 2023 by Kimberly

Apple crumble, a quick and delicious dessert for everyone. Sliced apples coated in cinnamon, topped with a quick crumble, and baked to perfection. A speedy treat satisfying every sweet tooth!

This website uses affiliate links which may earn commission for purchases made at no additional cost to you.

TOTAL TIME

60 min

SERVES

4 portions

DIET

vegetarian

EVERY RECIPE DESERVES

A Little Love Letter

Once upon a kitchen, there was Apple Crumble…

Picture a cozy apple crumble, fresh and warm. Its golden-brown, cinnamon-kissed top teases your senses. The sweet smell of baked apples promises flavorful joy. Each bite reveals tender apples under a crumbly layer, with a buttery crunch. To make it even more special, imagine a silky vanilla sauce generously poured over, creating a rich, creamy magic. The sauce enhances the apple sweetness, creating a luxurious harmony. Each spoonful is like a warm hug of sweetness and nostalgia.

To serve your delightful apple crumble, scoop generous portions onto plates while it’s still warm. Pair it with a scoop of vanilla ice cream for an extra treat. The contrasting temperatures create a heavenly experience. If you prefer a simpler approach, a dollop of whipped cream or a drizzle of caramel sauce also works wonders. For a cozy touch, consider serving it with a hot cup of coffee or tea.

When it comes to storing apple crumble, keep it in an airtight container in the refrigerator. This helps preserve its freshness and flavor. Before refrigerating, let it cool to room temperature. To reheat, use the oven for a few minutes to regain its warmth and crispiness. Alternatively, you can microwave individual servings for a quick fix. Just remember, while it can be stored, apple crumble is at its best when enjoyed freshly baked.

Hi, I'm Kimberly!

Hi, I'm Kimberly.

A hopeless romantic when it comes to food. Every recipe I share is a love letter to food itself. I’m so glad you’re here. Make yourself at home and stay a while.

Love,
Kimberly

Kimberly the Zett Signature

If you want to get to know me better,
click here!


Apple Crumble
Apple Crumble

LET’S MAKE A PIECE OF HAPPINESS

Print
.tasty-recipe-responsive-iframe-container-dcbbf165 { position: relative; overflow: hidden; padding-top: 56.3%; } .tasty-recipe-responsive-iframe-container-dcbbf165 iframe { position: absolute; top: 0; left: 0; width: 100%; height: 100%; border: 0; } clock clock iconcutlery cutlery iconflag flag iconfolder folder iconinstagram instagram iconpinterest pinterest iconfacebook facebook iconprint print iconsquares squares iconheart heart iconheart solid heart solid icon
Apple Crumble

Apple Crumble


  • Author: Kimberly
  • Total Time: 60 min
  • Yield: 4
  • Diet: Vegetarian

Description

GOOD TO HAVE ON HAND

  • 1 sharp knife
  • 1 medium bowl
  • 1 spoon
  • 1 baking dish 20 x 20 cm (8×8 inch)


Ingredients

Units Scale
FILLING
  • 3 apples (best use Granny Smith or Honeycrisp, but any other type will do)
  • 25 grams sugar
  • 1 tsp lemon juice
  • 1 tbsp corn starch
  • 1/4 tsp salt
  • 1/2 tsp cinnamon
  • 1 tsp vanilla extract
CRUMBLE
  • 100 grams all-purpose flour
  • 80 grams sugar
  • 1/2 tsp baking powder
  • 1/4 tsp salt
  • 1/4 tsp cinnamon
  • 85 grams butter

Instructions

PREPARATIONS

  • Preheat the oven to 190C° (375F°)
  • Peel 3 apples, remove the core, cut into bite-sized pieces and put the pieces in a bowl.
  • Melt 85g (4 tbsp) butter in a saucepan or in the microwave.

INSTRUCTIONS

  1. For the filling pour 1 tsp lemon juice over the chopped apples and mix. Then add sugar, cornstarch, salt, cinnamon and vanilla extract. Mix everything together.
  2. Place the apples in the baking dish and spread evenly.
  3. In the same bowl, mix the crumble. Add all-purpose flour, sugar, baking powder, salt, cinnamon and the melted butter. Mix everything together well to form a dough-like consistency. Place the bowl in the fridge for about 10 minutes.
  4. Crumble the mixture over the apples and spread evenly.
  5. Place the baking dish in the oven and bake at 190C° (375F°) for 35 minutes.
  6. Now you can top it with your favorites: This tastes delicious with warm vanilla sauce or cold vanilla ice cream. You can also add almonds on top. Make the apple crumble the way you like it best.

Notes

The calorie information may vary depending on the product used, country and region.

  • Prep Time: 5 min
  • Passive Time: 45 min
  • Cook Time: 10 min
  • Category: DESSERT
  • Method: BAKING
  • Cuisine: ENGLISH

CRAVING MORE?

Follow along here & don’t forget to subscribe to my substack!

Apple Sauce

Apple Sauce

Apple Sauce

Apple Sauce

May 15, 2024 by Kimberly

Indulge in homemade apple sauce—sweet, comforting, and perfect for pairing with a variety of dishes. A simple treat that’s both nutritious and delicious!

This website uses affiliate links which may earn commission for purchases made at no additional cost to you.

TOTAL TIME

30 min

SERVES

10 portions

DIET

vegan

EVERY RECIPE DESERVES

A Little Love Letter

Discover the joys of making your own apple sauce at home with my easy recipe. This delightful condiment is not only tasty but also packs a nutritious punch, perfect for any season.

Enjoy apple sauce as a snack, a dessert topping, or a side with potato pancakes . It’s especially delicious when warmed and sprinkled with a dash of cinnamon or mixed into your morning yogurt.

Store your apple sauce in an airtight container in the refrigerator. It keeps well for up to two weeks, making it a handy addition to your daily meals.

Hi, I'm Kimberly!

Hi, I'm Kimberly.

A hopeless romantic when it comes to food. Every recipe I share is a love letter to food itself. I’m so glad you’re here. Make yourself at home and stay a while.

Love,
Kimberly

Kimberly the Zett Signature

If you want to get to know me better,
click here!


Apple Sauce
Apple Sauce

LET’S MAKE A PIECE OF HAPPINESS

Print
.tasty-recipe-responsive-iframe-container-25cdafa2 { position: relative; overflow: hidden; padding-top: 56.3%; } .tasty-recipe-responsive-iframe-container-25cdafa2 iframe { position: absolute; top: 0; left: 0; width: 100%; height: 100%; border: 0; } clock clock iconcutlery cutlery iconflag flag iconfolder folder iconinstagram instagram iconpinterest pinterest iconfacebook facebook iconprint print iconsquares squares iconheart heart iconheart solid heart solid icon
Apple Sauce

Apple Sauce


  • Author: Kimberly
  • Total Time: 30 min
  • Yield: 10

Description

GOOD TO HAVE ON HAND

  • peeler
  • sharp knife
  • cutting board
  • medium-sized pot
  • immersion blender
  • sealable jars


Ingredients

Units Scale
  • 1 kilograms red apples
  • 100 milliliters water
  • juice of half a lemon
  • 50 grams white sugar

Instructions

  1. Peel the apples and cut them into large chunks.
  2. In a medium-sized pot, combine the apple pieces with water, lemon juice, and sugar. Cover and simmer over medium heat for about 20 minutes.
  3. Remove the pot from the heat and puree the mixture until smooth using an immersion blender.
  4. Transfer the applesauce into sterilized jars with screw tops or serve immediately.

Notes

The calorie information may vary depending on the product used, country and region.

  • Passive Time: 20 min
  • Cook Time: 10 min

CRAVING MORE?

Follow along here & don’t forget to subscribe to my substack!