


Description
GOOD TO HAVE ON HAND
- sharp knife
- cutting board
- vegetable peeler
- large pot
- baking dish
- medium-sized pot
- whisk
- medium-sized bowl
- piping bag
Ingredients
Units Scale
- 24 cannelloni roles
- 40 grams parmesan
- 125 grams mozzarella
- fresh basil
- 500 grams minced beef
- 500 grams minced pork
- 700 milliliters beef stock
- 1 tbsp butter
- 1 tbsp clarified butter
- 1 white onion
- 1/2 celery stick
- 1 carrot
- 4 garlic cloves
- 100 milliliters dry white wine
- 800 grams canned tomatoes
- 2 tbsp tomato paste
- 1/2 tsp oregano
- 1/4 tsp cinnamon
- 1/4 tsp chili flakes
- 1 tsp salt
- 1/4 tsp black pepper
- 500 milliliters full-fat cow milk
- 50 grams butter
- 50 grams all-purpose flour
- 1/8 tsp white pepper
- 3/8 tsp salt
- freshly grated nutmeg to taste
Instructions
- Peel the carrots, onion, and garlic, and chop them along with the celery into very small pieces. Set aside.
- Melt the clarified butter in a large pot and thoroughly brown the minced meat until a nice crust forms on the bottom. Then remove the meat from the pot and set it aside in a bowl.
- Now add the carrots, onion, garlic, and celery to the pot with 1 tbsp butter and sauté for about 5 minutes until soft. Deglaze with white wine and scrape up the crusty from the bottom. Return the ground meat to the pot along with tomato paste and a pinch of salt. Sauté for 1-2 minutes.
- Add beef broth and canned tomatoes and simmer over medium heat for about 1 hour without a lid. The consistency should be creamy-thick, neither too liquid nor too solid, just firm enough so that it doesn’t run out of the cannelloni when filling them. Now add oregano, salt, pepper, chili, and cinnamon, and season well. Set the filling aside to cool slightly.
- Meanwhile, prepare the béchamel sauce. The recipe can be found here: Béchamel Sauce. Once prepared, set it aside. Preheat the oven to 200°C / 392°F.
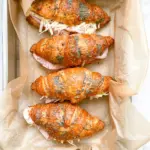
- Set up your cannelloni filling station. You’ll need the meat filling in the pot, a piping bag, a baking dish, and a spoon. Place about 4 tablespoons of the meat filling at the bottom of the baking dish. Fill your piping bag with a few tablespoons of the filling and pipe it into the cannelloni. I recommend not overfilling the piping bag to maintain control. Fill all the cannelloni one by one and arrange them in a single layer over the sauce in your baking dish. Spread the remaining sauce over the cannelloni.
- Next, pour the béchamel over the cannelloni, ensuring all gaps are filled with sauce. Top with grated mozzarella and Parmesan.
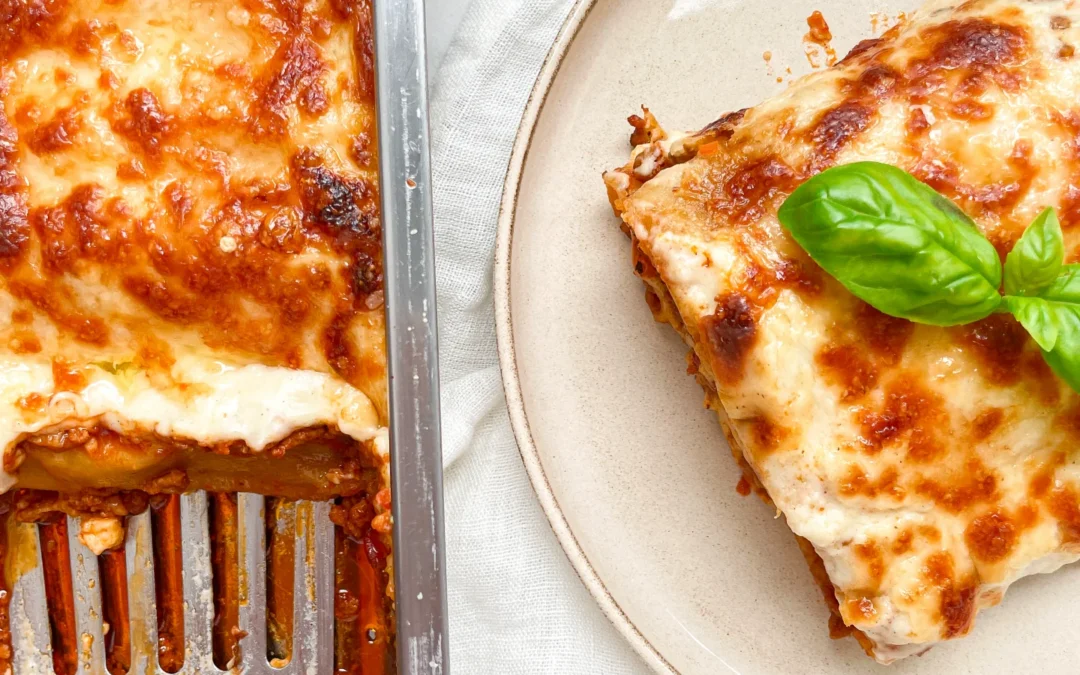
- Cover the baking dish with aluminum foil and bake for 30 minutes. After 30 minutes, remove the foil, increase the oven temperature to 220°C / 428°F, and bake for an additional 15 minutes until the cheese is crispy. Optionally, you can slice fresh basil into fine strips and sprinkle over the cannelloni.
Notes
The calorie information may vary depending on the product used, country and region.
- Passive Time: 1 hour 45 min
- Cook Time: 60 min